
Desserts
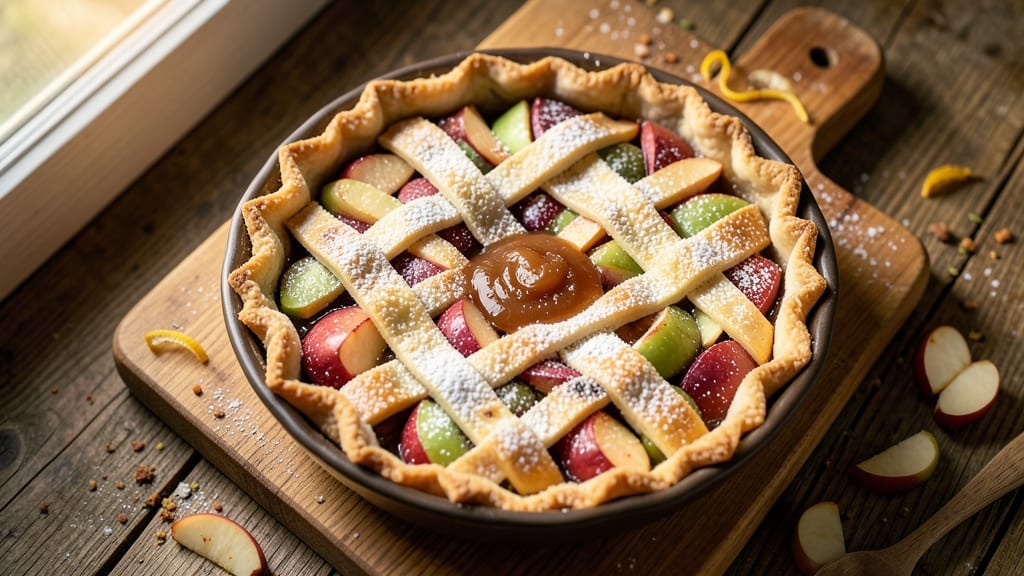
This step-by-step printable apple pie recipe delivers the perfect balance of flaky crust and tender filling every time—no more soggy bottoms or burnt edges. The secret lies in a lattice crust that creates delicate flavor layers while keeping the filling juicy and golden. I've perfected this method through years of testing, ensuring each slice has that ideal mix of crispy, buttery crust and spiced apple goodness.
The recipe begins with a foolproof pie crust made from simple ingredients like all-purpose flour, cold butter, and a touch of ice water. We'll roll it out evenly, fit it into your pie dish, and create that signature lattice pattern for both beauty and functionality.
The filling combines sweet-tart apples with warm cinnamon, nutmeg, and a touch of lemon juice to brighten the flavors.
After baking at 375°F for 50-60 minutes, you'll have a pie with a golden, flaky crust and a filling that's tender but not mushy. The lattice allows steam to escape while keeping the apples perfectly cooked.
This recipe includes clear measurements in cups and grams, making it easy to follow whether you're a seasoned baker or just starting out.
Print out the instructions and gather your ingredients—this apple pie is perfect for holidays, family gatherings, or anytime you want to impress with a classic dessert. The step-by-step approach ensures success, and the lattice crust adds that restaurant-quality touch. Let's get baking!
Ingredients for step by step printable apple pie
Pantry staples plus seasonal apples make this lattice-topped pie a showstopper every time.
| Ingredient | Amount | Notes |
|---|---|---|
| All-Purpose Flour 🌾 | 2 ½ cups | Sifted for flaky crust |
| Unsalted Butter 🧈 | 1 cup | Cold, cubed for best texture |
| Ice Water 💧 | ⅓ cup | Chilled for pie crust |
| Granulated Sugar 🍚 | 1 ½ cups | For filling sweetness |
| Light Brown Sugar 🍚 | ¼ cup | Packed for caramel notes |
| Apples 🍎 | 6 medium | Sweet-tart variety like Honeycrisp |
| Lemon Juice 🍋 | 2 tbsp | Freshly squeezed for brightness |
| Ground Cinnamon 🌿 | 2 tsp | Freshly ground preferred |
| Ground Nutmeg 🌿 | ½ tsp | Freshly grated for warmth |
| Large Eggs 🥚 | 1 whole | For egg wash |
| Coarse Sugar 🍚 | 2 tbsp | For lattice crust |
| Salt 🧂 | 1 tsp | Kosher or sea salt |
| Allspice 🌶️ | ¼ tsp | Optional for depth |
The butter is non-negotiable—Plugrá or Land O'Lakes unsalted are my go-tos, but any cold, high-fat butter works. Look for apples with bright red or yellow skin and firm texture—Honeycrisp or Granny Smith are perfect. If you can't find those, Fuji or Gala work too. The flour should be white all-purpose, not self-rising or whole wheat, for that perfect flaky texture. Keep everything cold until you're ready to roll out the dough—this is key for that buttery, layered crust.
No allspice? Skip it—this pie still shines. Short on brown sugar? White sugar works at the same amount, but you'll lose that caramel depth. The eggs? Room temperature for the wash, but keep the dough egg cold. Pre-sliced apples? Toss them in lemon juice immediately to prevent browning. For the lattice, cut strips about 1/2-inch wide—they should fit snugly across the pie. If your strips are uneven, trim the edges with kitchen shears for a clean look.
The dough keeps 2 days wrapped in plastic in the fridge or 3 months frozen. Prep the filling ahead and store it covered in the fridge for up to 24 hours. The pie itself? Best served at room temperature after 1 hour out of the oven. I always make a double batch—one for now, one for freezing. Wrap it tightly in foil and it'll taste fresh for up to 3 months. Leftovers? Reheat slices at 350°F for 10 minutes—they warm up beautifully.
Why You'll Love This Recipe
- No-Fuss Dough: I swear by this recipe’s crust—just flour, butter, and ice water. No food processor, no overworking the dough, and that flaky magic happens every time. Honestly, the butter-to-flour ratio here is my secret for a crust that’s crisp on the edges but tender enough to melt in your mouth.
- Sweet Spot Balance: That mix of granulated and light brown sugar in the filling? It’s what turns this pie from good to ridiculously good. The brown sugar caramelizes while baking, giving those apples a deep, buttery richness that pairs perfectly with the tartness. I’ll be real: my kids ask for seconds before the pie even cools.
- Weekend or Weeknight: Between us, this is my go-to for any gathering—holiday dinners, potlucks, or even a lazy Sunday with coffee. The printable steps mean I’m not stressing over measurements, and the filling stays fresh for days if you’re prepping ahead. (Yes, even on a Tuesday night.)
- Leftover Goldmine: One pie lasts my family three meals—sliced warm for breakfast, cold with ice cream for dessert, or even reheated as a filling for oatmeal. The crust stays sturdy enough to reheat without turning soggy, and the sugar keeps it tasting fresh. Budget-friendly? Absolutely. Worth the effort? Always.
Step-by-step instructions for lattice crust apple pie
Here's how to build a pie with layers of flavor and that signature lattice design.
Make the Classic Pie Crust
In a large bowl, combine the 2.5 cups all-purpose flour and 1 tsp salt. Cut in the 1 cup cold, cubed unsalted butter using a pastry cutter or your fingers until the mixture resembles coarse crumbs with pea-sized butter pieces. This texture is crucial for flaky layers.
Add 0.33 cup ice water gradually, mixing gently with a fork until the dough just comes together. Avoid overworking it - the dough should hold when pressed but still feel slightly crumbly. Divide the dough into two equal portions, flatten into discs, wrap in plastic, and chill for at least 1 hour. This resting period relaxes the gluten for perfect layers.
Prepare the Perfect Apple Filling
Peel, core, and slice the 6 medium apples into ¼-inch thick slices. Toss them immediately with 2 tbsp lemon juice to prevent browning. In a large bowl, combine the apples with 1.5 cups granulated sugar, 0.25 cup packed light brown sugar, 2 tsp ground cinnamon, 0.5 tsp ground nutmeg, and 0.25 tsp allspice. Mix gently but thoroughly to distribute the spices evenly.
Let the filling sit for 10 minutes while you roll out the crust. This allows the juices to begin releasing and the flavors to meld. The filling should look glossy and fragrant - if it looks dry, add 1-2 tbsp water to help it cook properly in the oven.
Assemble the Pie with Precision
Roll out one dough disc on a floured surface to fit a 9-inch pie dish, leaving a 1-inch overhang. Transfer to the dish and trim the edges to ½-inch. Roll out the second dough disc for the lattice top. Cut into 12 strips (about 1-inch wide) using a sharp knife or pizza cutter.
Arrange the strips in a herringbone pattern over the filling, alternating directions every other strip. Brush the lattice with beaten egg (from the 1 whole large egg) for a golden finish. Sprinkle 2 tbsp coarse sugar over the lattice - this creates beautiful caramelized highlights when baked. The lattice should look like a delicate web covering the filling completely.
Bake to Golden Perfection
Preheat your oven to 375°F. Place the assembled pie on a baking sheet (to catch any drips) and bake for 50-60 minutes until the crust is deep golden brown and the filling bubbles gently at the edges. The center should be just set but still slightly soft - it will continue cooking as it cools.
Here's the thing - don't open the oven during baking. The temperature fluctuations can cause the crust to puff up unevenly. When the top is beautifully browned and smells like autumn in a bakery, remove from the oven. Let the pie cool for at least 2 hours before slicing - this resting period allows the filling to set properly and the juices to distribute evenly.
Pro Tips For Making Step By Step Printable Apple Pie
- CHILL THE BUTTER FIRST: Cold butter is your crust’s best friend—cut it into ½-inch cubes and freeze them for 15 minutes before mixing with flour. I learned this the hard way when my first pie dough turned into a greasy mess because the butter melted too fast. Keep everything cold, even the mixing bowl.
- WEIGHT THE APPLES: Don’t eyeball it—use a scale for the sugar in the filling. A 900g batch of apples (about 6 medium) pairs perfectly with ¾ cup sugar. Too little sugar? Your pie tastes bland. Too much? It’s cloying. Trust the numbers, not your guesswork.
- VENT THE CRUST: Cut a 3-inch slit in the top crust before baking—yes, even if it’s not traditional. This prevents a puffed, uneven top and lets steam escape so your apples cook through. I used to skip this, and my pies always came out soggy in the middle.
- BRUSH WITH EGG WASH: Whisk 1 egg with 1 tablespoon water, then brush it only on the top crust edges before baking. This creates a golden, flaky seal that locks in moisture. Skip the full crust brush—it makes the filling soggy. (Your future self will notice the difference.)
Storing and reheating your step by step printable apple pie
Refrigerator Storage
Store your freshly baked apple pie in an airtight container at room temperature for up to 2 days—it's best enjoyed warm or at room temperature. If you need to refrigerate, wrap it tightly in plastic wrap and place it in the fridge for up to 4 days.
The lattice crust stays crisp, while the filling remains tender when properly stored. 💫
For the filling alone, transfer it to a glass storage container and refrigerate for up to 24 hours before assembling. The spices and lemon juice keep it fresh, but the texture changes slightly after baking. I always make a double batch of filling—one for immediate use and one for freezing.
Freezer Storage
Wrap the entire pie tightly in heavy-duty aluminum foil or plastic wrap, then place it in a freezer bag to prevent freezer burn. Label with the date—it'll keep for up to 3 months without losing quality.
Thaw overnight in the fridge before reheating. The crust holds up beautifully, though it may lose some crispness after freezing.
For individual slices, wrap each piece in parchment paper and place them in a freezer bag. This method preserves the lattice's delicate design and prevents sogginess. Reheat slices directly from frozen at 350°F for 15-20 minutes until warmed through.
Reheating Slices
For the best results, reheat slices in a preheated oven at 350°F for 10-12 minutes. Place them on a baking sheet lined with parchment paper to catch any drips. The oven method keeps the lattice crisp and the filling warm without drying it out.
If you're short on time, the microwave works in a pinch—use 50% power for 1-2 minutes to avoid rubbery crust.
Add a splash of water or apple cider to the reheating dish if the filling looks dry. This helps restore moisture and keeps the spices vibrant. I like to broil slices for the last 1-2 minutes to crisp up the lattice again—just watch closely to avoid burning.
Reviving Day-Old Pie
If your pie has lost its crispness overnight, brush the lattice with a light egg wash and bake at 375°F for 8-10 minutes. This quick refresh restores the golden color and crunch. For extra flair, sprinkle with coarse sugar before reheating—it caramelizes beautifully and adds a sweet crunch.
Leftovers taste even better the second day! The filling continues to develop deeper flavors as it rests. Store any uneaten slices in an airtight container in the fridge for up to 3 more days. The lattice stays intact, and the apples remain juicy when reheated properly. 🍏
Nutrition facts
Frequently asked questions
Can I make this apple pie ahead of time?
This recipe is perfect for making ahead. You can prepare the filling and crust separately up to 2 days in advance and store them in the fridge. Assemble the pie just before baking, then bake as directed. For the best results, let the pie cool completely before slicing and storing. The lattice crust stays crisp, and the filling develops deeper flavors overnight.
What if I don't have a lattice topper?
No problem! You can create the lattice by hand using the second dough disc. Roll it out and cut into 12 strips (about 1-inch wide) with a sharp knife or pizza cutter. Arrange them in a herringbone pattern over the filling, alternating directions every other strip. Brush with egg wash and sprinkle with coarse sugar for that classic look.
How do I prevent a soggy bottom crust?
Prevent soggy bottoms by pre-baking the crust for 10-12 minutes at 375°F before adding the filling. This creates a barrier that won't absorb moisture. Another trick is to sprinkle a thin layer of dry breadcrumbs or crushed cornflakes on the bottom crust before adding the filling. This absorbs excess juices and keeps the crust crisp.
Can I use frozen apples instead of fresh?
Yes, but you'll need to thaw and drain them first. Use 6 cups frozen apples (about 6 medium apples equivalent), thawed and drained thoroughly. Frozen apples work well, but they may release more liquid, so you might need to reduce the sugar slightly (1 cup granulated sugar) to balance the sweetness. Toss the apples with lemon juice to prevent browning and enhance flavor.
How do I adjust the recipe for a smaller or larger pie dish?
For an 8-inch pie dish, reduce the dough to 2 cups flour and the filling to 5 apples (about 4 cups sliced). For a 10-inch dish, increase the dough to 3 cups flour and use 7-8 apples (about 6-7 cups sliced). Keep the lattice proportions similar—cut strips to fit the new dish size, and adjust the baking time by 5-10 minutes depending on the depth.