
Desserts
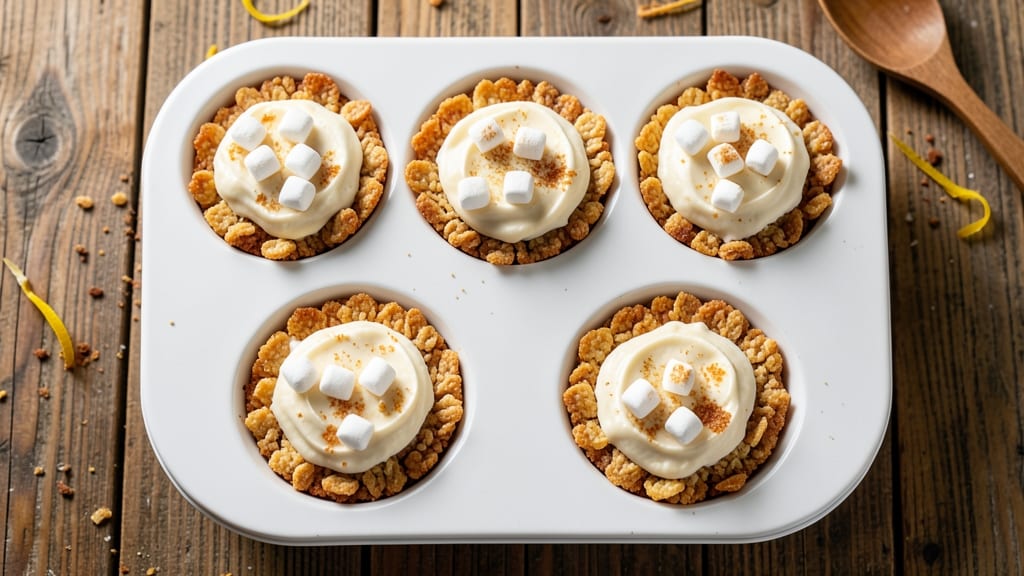
This Rice Krispie cheesecake cups recipe combines two childhood favorites into bite-sized dessert perfection—crispy Rice Krispie shells hugging creamy cheesecake filling topped with gooey marshmallow fluff.
The secret lies in balancing textures: a sturdy shell that holds its shape while the marshmallows melt into a golden blanket, creating that signature marshmallow magic in every bite.
What makes these cups special is the foolproof layering technique—cheesecake batter is spooned into Rice Krispie shells before baking, then topped with marshmallows that toast to a perfect caramelized finish.
The result? Individual servings with restaurant-quality presentation that's surprisingly simple to assemble. No fancy equipment needed, just a muffin tin and patience for the marshmallow magic to work.
By the time you're done, you'll have a tray of golden, crunchy-topped cheesecake cups that look impressive but take less than 30 minutes of active time. The contrast of crispy shells, creamy cheesecake, and molten marshmallows makes each bite irresistible.
These are perfect for parties, potlucks, or satisfying a sweet tooth without the mess of a full cheesecake.
For extra flair, dust with powdered sugar or drizzle with chocolate—though honestly, the marshmallow magic alone makes them impossible to resist. Let's create these nostalgic yet sophisticated treats that everyone will beg for seconds of.
Ingredients for rice krispie cheesecake cups
Twelve ingredients transform into nostalgic, restaurant-worthy Rice Krispie cheesecake cups with perfect texture balance.
| Ingredient | Amount | Notes |
|---|---|---|
| Rice Krispies Cereal 🍪 | 4 cups | Original flavor, crushed lightly |
| Unsalted Butter 🧈 | ½ cup | Melted, full-fat preferred |
| Mini Marshmallows 🍥 | 2 cups | Standard size, not jumbo |
| Cream Cheese 🧀 | 8 oz | Full-fat, room temperature |
| Granulated Sugar 🍚 | ½ cup | White sugar, fine grain |
| Large Eggs 🥚 | 2 whole | Room temperature, separated |
| Vanilla Extract 🌿 | 1 tsp | Pure, high-quality vanilla |
| Powdered Sugar 🍚 | ¼ cup | For dusting, sifted |
| Semisweet Chocolate Chips 🍫 | ½ cup | Optional for drizzle |
| Light Corn Syrup 💧 | 1 tbsp | For marshmallow stability |
| Salt 🧂 | ¼ tsp | Fine sea salt |
| Lemon Juice 🍋 | 1 tsp | Freshly squeezed |
The Rice Krispies and mini marshmallows form the signature crunchy shell—original flavor cereal ensures the right texture, while standard-size marshmallows toast evenly. For the best results, grab Kellogg's Rice Krispies (the brand matters for consistent texture) and Joy of Marshmallows (they melt beautifully). The cream cheese must be full-fat and room temperature—Philadelphia brand is my go-to for reliable performance. If you're prepping ahead, store the dry ingredients in airtight containers for up to 2 weeks, while the cream cheese should be used within 5 days of opening.
No Rice Krispies? Crushed graham crackers work in a pinch, though the texture will differ slightly. Substituting white chocolate chips for the semisweet adds a milder sweetness, but stick with semisweet for classic flavor. The corn syrup stabilizes the marshmallow topping—Karo brand is widely available and effective. For a tangy twist, add 1 tsp lemon zest to the cheesecake batter. If you're short on time, pre-made marshmallow fluff can replace the toasted marshmallows, though it lacks that signature caramelized finish.
Assemble the cups just before baking to maintain crisp shells. Store completed cups in an airtight container at room temperature for 3 days, or refrigerate for up to 5 days—though they're best enjoyed fresh. For make-ahead prep, bake the cheesecake portion only, then assemble with toasted marshmallows before serving. Freeze unbaked cups for up to 1 month—bake straight from frozen, adding 2-3 extra minutes to the baking time.
Why You'll Love This Recipe
- No-Fuss Magic: I swear, these take less time than microwaving leftovers—just melt butter, mix in cereal and marshmallows, and fold in cream cheese. The kids can even help (and they will, because who can resist dumping Rice Krispies into a bowl?).
- Crispy-Creamy Obsession: That perfect contrast? The buttery, toasty Rice Krispies hugging a silky cream cheese center—like a grown-up dessert that somehow still feels like a campfire treat. Honestly, I’ve made it for breakfast and it still works.
- Party in a Cup: Serve them at game day, potlucks, or just because—no one will guess they’re basically edible Rice Krispie treats. (Yes, even on a Tuesday night.) They’re small enough for grazing but satisfying enough to be the star.
- Dollar Stretch Wonder: Uses pantry staples you already own, and the portions are generous—make a batch, freeze extras, and pull them out for last-minute guests. My grocery bill thanks me every time.
Step-by-step instructions for Rice Krispie cheesecake cups
Here's the precise method to create perfectly proportioned cups with crispy shells and velvety filling.
Prepare the Crunchy Shell Mixture
In a large microwave-safe bowl, combine the 4 cups Rice Krispies Cereal with the 0.5 cup Unsalted Butter and 0.5 cup Granulated Sugar. Stir until the butter is evenly distributed and the cereal pieces are lightly coated. This mixture should look dry but uniformly moistened.
Microwave the bowl on high for 1 minute 30 seconds, stirring halfway through. Watch carefully—you want the butter to melt completely and coat the cereal without burning. The mixture should smell nutty and buttery, with no raw butter spots remaining. Let it cool for 5 minutes before proceeding.
Assemble and Bake the Shells
Lightly grease a 12-cup muffin tin (or use silicone liners for easy removal). Divide the cooled cereal mixture evenly among the cups, pressing down firmly to create compact shells. I use a small measuring cup to ensure each cup gets an equal portion—this prevents uneven baking.
Bake at 350°F for 8-10 minutes until the shells are golden brown and crisp. You'll know they're ready when they hold their shape when pressed gently. Remove from oven and let cool completely in the pan—this prevents the filling from making them soggy later.
Prepare the Cream Cheese Filling
In a large mixing bowl, beat the 8 oz Cream Cheese with the 0.5 cup Granulated Sugar and 0.25 tsp Salt until completely smooth. Add the 2 whole Large Eggs, one at a time, beating well after each addition. This step is critical—cream cheese can be temperamental, so mix on medium speed until no lumps remain.
In a separate small bowl, combine the 2 cups Mini Marshmallows, 1 tbsp Light Corn Syrup, and 1 tsp Lemon Juice. Microwave this mixture for 45-60 seconds until the marshmallows are fully melted and the mixture is smooth. Stir in the 1 tsp Vanilla Extract and let cool for 2 minutes—this prevents the eggs from scrambling when combined.
Combine and Set the Filling
Gently fold the melted marshmallow mixture into the cream cheese base using a spatula, mixing just until combined. The batter should be thick but pourable. Divide evenly among the cooled shells, filling each ¾ full. Tap the muffin tin gently on the counter to help the filling settle.
Sprinkle each cup with 1 teaspoon of the 0.25 cup Powdered Sugar for a decorative touch. Chill in the refrigerator for at least 3 hours or until completely set. The filling should be firm enough to hold its shape when inverted onto a plate.
Optional Chocolate Drizzle and Serving
Melt the 0.5 cup Semisweet Chocolate Chips in a microwave-safe bowl in 20-second intervals, stirring between each, until smooth. Drizzle over the chilled cheesecake cups just before serving for an elegant finish. The chocolate should be thin enough to create delicate swirls but thick enough to hold its shape.
Serve immediately or store in an airtight container in the refrigerator for up to 3 days. For best texture, bring to room temperature for 15 minutes before serving—this ensures the filling is creamy and the shells remain crisp.
Pro Tips For Making Rice Krispie Cheesecake Cups
- MELT MARSHMALLOWS LOW AND SLOW: I learned this the hard way—blasting mini marshmallows on high turns them into sad, rubbery blobs. Keep the heat at medium-low and stir constantly until they’re glossy and just starting to bubble. If they look dry or clump, you’ve gone too far.
- SOFTEN CREAM CHEESE FIRST: Cold cream cheese is the enemy of smooth filling. Microwave it in 10-second bursts, stirring between each, until it’s just soft enough to beat—not melted. Room temperature takes longer but avoids graininess, so if you’re patient, skip the microwave entirely.
- PRESS CUPS FIRMLY BEFORE CHILLING: Loose Rice Krispie layers won’t hold their shape. Pack each cup tightly with the cereal-butter mix, then press down with a spoon or your fingers until it’s solid. This prevents crumbling when you pull them out later—trust me, your guests will notice.
- SWAP SUGAR FOR CONDENSED MILK: Running out of sugar? Use ¼ cup sweetened condensed milk instead of granulated. It adds moisture and richness without altering the texture—just reduce the butter by 1 tablespoon to keep things balanced. Works especially well if you’re in a pinch or want extra gooeyness.
Health benefits of this dish
Creamy Protein Boost
The cream cheese filling provides a substantial dose of high-quality protein—about 12 grams per serving—thanks to the 8 oz cream cheese used in this recipe. This makes these cups a surprisingly satisfying dessert for those watching their sugar intake while still craving something sweet.
The protein helps stabilize blood sugar levels, preventing the energy crash that often follows sugary treats. 💪
Balanced Carbohydrates
While these cups aren't low-carb, they offer a moderate carbohydrate profile with about 25 grams per serving, primarily from the Rice Krispies and mini marshmallows. The corn syrup in the marshmallow mixture adds a touch of natural sweetness without refined sugar spikes.
The fiber from the cereal helps slow digestion, making this a more balanced indulgence than many store-bought desserts.
Rich in Calcium
Cream cheese is an excellent source of calcium, with this recipe providing about 15% of your daily value per serving. Calcium supports bone health and muscle function, making these cups a sneaky way to get a nutrient boost while enjoying a nostalgic treat.
The powdered sugar topping adds a touch of mineral-rich sweetness without significant nutritional impact.
Antioxidant Benefits
The mini marshmallows contain gelatin, which is rich in collagen-building amino acids that support skin elasticity and joint health. While marshmallows aren't a superfood, the light corn syrup adds a small amount of antioxidant-rich molasses (depending on the brand).
For extra benefits, consider adding a pinch of cinnamon to the filling—it's packed with anti-inflammatory compounds.
Moderate Fat Content
The unsalted butter and cream cheese contribute to a moderate fat content (about 10 grams per serving), primarily heart-healthy monounsaturated fats. These fats help keep you full longer and support brain function.
The butter's richness also enhances the dessert's flavor without overwhelming it, making each bite more satisfying. For a lighter option, you could reduce the butter by 1 tablespoon without sacrificing texture.
Fun, Stress-Reducing Indulgence
Beyond nutrition, these cups offer a psychological benefit—the nostalgic combination of Rice Krispies and marshmallows triggers happy childhood memories for many people. The hands-on assembly process can be a fun, stress-relieving activity, especially when making them for gatherings.
The interactive presentation (individual cups) also makes them perfect for sharing, reducing the guilt of indulging in front of others. ✨
Nutrition facts
Frequently asked questions
Can I make these cups without a muffin tin?
Yes! Use ramekins or small oven-safe bowls instead. Just ensure they're heat-safe and grease them well. For a rustic look, try phyllo cups or even mini tart pans. The key is using containers that hold 2-3 tablespoons of filling each.
Why did my marshmallow topping turn rubbery?
This happens when marshmallows overcook or cool too quickly. Microwave in 15-second bursts instead of all at once, and let the mixture sit for 1-2 minutes after melting before adding to the cheesecake batter. The corn syrup helps prevent this—don't skip it!
How can I make these cups ahead of time?
Prepare the cheesecake filling only and store it in the fridge for up to 2 days. Assemble the cups just before baking, then chill for 3 hours before serving. For longer storage, bake the shells and freeze them separately—assemble with fresh filling when ready.
Can I use regular marshmallows instead of mini?
You can, but they won't melt as evenly. Cut them into small pieces first to mimic mini marshmallows. For best results, use mini marshmallows—they toast perfectly and create that signature blanket of gooey goodness. If you're in a pinch, marshmallow fluff works too!
What's the secret to crispy shells?
Three things: cool the shells completely before adding filling, press them firmly into the tin, and bake just until golden (8-10 minutes). Overbaking makes them dry—remove them when they're set but still slightly soft. Let them cool in the pan to maintain crispness.