
Desserts
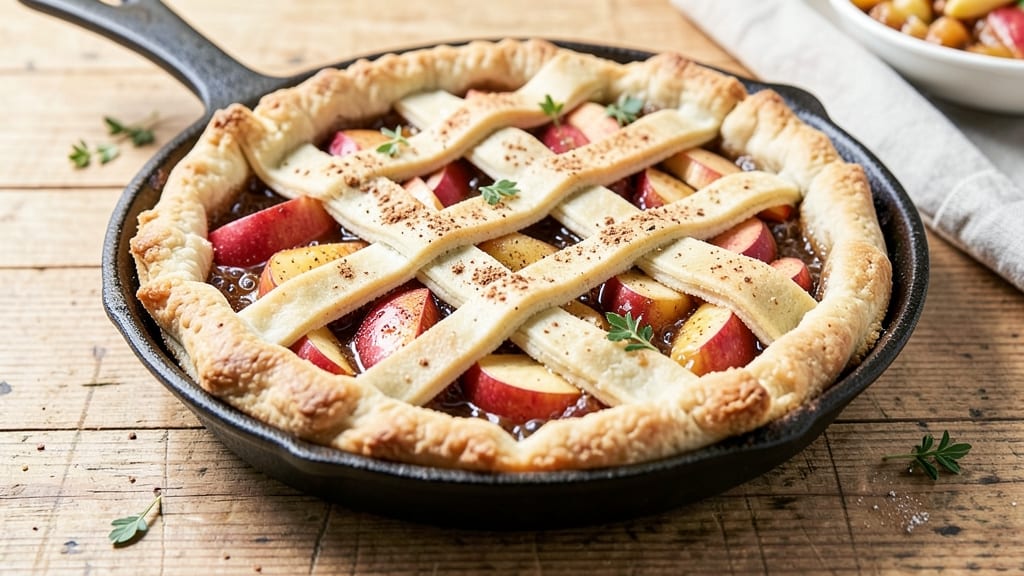
This pioneer apple pie recipe brings frontier baking traditions to your kitchen with a rustic crust and spiced filling that tastes like autumn in a pan. 🍂 The secret lies in a simple, no-refrigeration dough that pioneers relied on—flour, lard, and ice water for a tender yet sturdy crust.
I’ve perfected the balance between flaky layers and a filling that’s just sweet enough to let the apples shine through their natural tartness.
What makes this pie truly authentic is the technique: a deep-dish style baked in a cast-iron skillet (just like early settlers did) with a lattice top for crisp edges and steamy centers.
The spice blend—cinnamon, nutmeg, and allspice—echoes historic recipes, while the apples (use a mix of tart and sweet varieties) caramelize beautifully without turning mushy. It’s the kind of pie that transports you to a covered porch in 1850s America.
The result is a pie with a golden, crackly crust that holds its shape even when sliced, and a filling so perfectly spiced that every bite tastes like nostalgia.
The lattice design not only looks elegant but also keeps the apples tender while allowing their juices to mingle with the crust. This isn’t just dessert—it’s a piece of history you can eat.
Perfect for harvest gatherings, holiday tables, or when you crave a slice that tastes like home. The recipe scales easily, and leftovers reheat beautifully. Let’s get baking—your kitchen (and taste buds) will thank you.
Ingredients for pioneer apple pie
Flour, lard, and apples—simple frontier ingredients for a pie that tastes like autumn nostalgia.
| Ingredient | Amount | Notes |
|---|---|---|
| All-Purpose Flour 🌾 | 3 cups | Unbleached preferred for flakiness |
| Lard 🧈 | 1 cup | Leaf or leaf lard for best texture |
| Granulated Sugar 🍚 | 1 ½ cups | White or light brown |
| Light Brown Sugar 🍚 | ½ cup | Packed firmly |
| Ground Cinnamon 🌿 | 2 tbsp | Freshly ground preferred |
| Ground Nutmeg 🌿 | 1 tsp | Freshly grated nutmeg |
| Ground Allspice 🌶️ | ½ tsp | For authentic pioneer flavor |
| Salt 🧂 | ½ tsp | Diamond Crystal preferred |
| Ice Water 💧 | ½ cup | For tougher dough handling |
| Apples (Mixed Varieties) 🍎 | 6 medium | Tart and sweet mix (e.g., Granny Smith + Honeycrisp) |
| Lemon Juice 🍋 | 1 tbsp | Freshly squeezed |
| Unsalted Butter 🧈 | ½ cup | Cold, cubed for lattice |
The lard is non-negotiable here—it gives that iconic pioneer crust texture. Leaf lard is best, but regular works in a pinch. For flour, King Arthur or Bob's Red Mill are my go-tos—they're consistent. If you can't find leaf lard, vegetable shortening works but lacks that authentic flavor. The apples are the heart of this pie, so don't skimp. Granny Smith for tartness and Honeycrisp for sweetness is my perfect combo. If you can only find one variety, use Braeburn or Jonathan—they hold up well during baking.
No lard? Cold butter works, though the crust will be slightly less flaky. Short on cinnamon? Cassia is a perfect substitute—just use the same amount. The allspice is what makes this taste authentically pioneer—don't skip it! For the apples, if you can't find mixed varieties, use all tart or all sweet and adjust the sugar in the filling accordingly. The lemon juice prevents browning and adds brightness—fresh is key. No lemon? A splash of apple cider vinegar works in a bind.
This dough keeps 2 days wrapped in plastic in the fridge or 3 months frozen. The filling can be prepped ahead and stored separately. Once baked, the pie reheats beautifully—just 10 minutes at 350°F to warm through. The lattice keeps its shape for 3 days at room temperature, but for best texture, store wrapped at room temperature. For serving, a dusting of powdered sugar or extra cinnamon makes it look like it came straight from a covered porch in 1850s America.
Why You'll Love This Recipe
- No-Fuss Crust: I swear by this lard-based crust—it’s flaky without the fuss of butter, and the cold pats mixed straight into flour take five minutes. No rolling required, just fold and press. (Yes, even on a Tuesday night.)
- Spiced Simplicity: That brown sugar and cinnamon combo? It’s the kind of warmth that makes you slow down. The apples stay tender while the edges get just crisp enough—no overbaked dryness here.
- Crowd-Pleaser Always: Bring this to a potluck, holiday dinner, or even a school bake sale. The lard crust holds up better than butter-based ones, and the sugar balance means everyone will ask for seconds. (My mom’s church group still talks about the 2018 version.)
- Budget Magic: Flour, lard, sugar—these are pantry staples that won’t break the bank. A single pie costs me less than takeout, and leftovers? Perfect for toast or oatmeal the next morning. (Between us, I’ve stretched one into three breakfasts.)
Step-by-step instructions for pioneer apple pie
Here's how to craft a classic pie with a flaky crust and spiced filling that tastes like home.
👨🍳 Step 1: Make the Rustic Crust
In a large bowl, whisk together the 3 cups all-purpose flour, 2 tbsp ground cinnamon, 1 tsp ground nutmeg, 0.5 tsp ground allspice, and 0.5 tsp salt. Cut in the 1 cup lard using a pastry cutter or two forks until the mixture resembles coarse crumbs with pea-sized fat pieces. This texture is key for flaky layers.
Add the 0.5 cup ice water gradually, mixing gently with a fork until the dough just comes together. Avoid overmixing—just combine until it holds when pressed. Divide the dough into two equal parts, flatten into discs, wrap in plastic, and chill for at least 1 hour. The cold dough handles better and creates crispier layers.
🍳 Step 2: Prepare the Spiced Apple Filling
Peel, core, and slice the 6 medium apples into ¼-inch thick slices. Toss them immediately with 1 tbsp lemon juice to prevent browning. In a large bowl, combine the apple slices with the 1.5 cups granulated sugar, 0.5 cup light brown sugar, 1 tsp ground nutmeg, and 0.5 tsp ground allspice. Mix gently but thoroughly to distribute the spices evenly.
Let the filling sit for 15 minutes while you roll out the crust. This resting time allows the juices to release slightly, ensuring a moist filling that won't turn into apple sauce. The spices will infuse better too—this is where the authentic pioneer flavor comes through.
🥘 Step 3: Assemble the Pie
On a floured surface, roll out one dough disc into a 12-inch circle (about ¼-inch thick). Transfer it to a 9-inch pie dish, pressing gently to fit. Trim any excess dough hanging over the edge. Roll out the second dough disc and cut it into ½-inch strips for a lattice top.
Arrange the apple filling in the crust, mounding it slightly in the center. This creates a beautiful dome shape when baked. Weave the dough strips over the filling in a lattice pattern, leaving the center open for steam to escape. Brush the lattice with a little water to help it brown.
🔥 Step 4: Bake to Golden Perfection
Preheat your oven to 375°F. Place the assembled pie on a baking sheet (to catch any drips) and bake for 45-50 minutes until the crust is deep golden brown and the filling is bubbling. The edges should be crisp, and the lattice should look beautifully crisped.
For the final touch, dot the lattice with 0.5 cup cold unsalted butter cubes. Return the pie to the oven for 5-10 minutes until the butter melts and the crust takes on an even richer color. Let it cool for at least 2 hours before slicing—this resting time lets the filling set and makes for cleaner slices.
Pro Tips For Making Pioneer Apple Pie
- CHILL THE LARD FIRST: Cold lard makes flaky crusts, not greasy messes. Take it straight from the fridge, cut it into ¼-inch cubes, and toss them into the flour mix—this keeps the fat firm enough to create layers instead of melting into a paste. I learned this the hard way when my first attempt came out more like a biscuit than a pie.
- DON’T SKIP THE BROWN SUGAR: That light brown sugar isn’t just for flavor—it’s the thing that matters most for caramelization. Use it in both the filling and the lattice (if you’re doing one), and don’t substitute white sugar unless you want a sharper, less complex pie. My grandmother swore by this, and she was right: the molasses notes in brown sugar deepen as it bakes.
- STEAM THE APPLES FIRST: Toss your sliced apples with sugar and cinnamon, then microwave them for 3 minutes before adding them to the pie. This softens them slightly and releases their juices, so they don’t turn to mush later. Sounds weird, but it works: no soggy bottoms, no watery fillings.
- BAKE UNTIL THE CRUST STOPS BUBBLING: Pioneer pies need a deep golden color, not just a pale crust. Bake until the edges are set and the center stops rising—usually 45–55 minutes at 375°F, but don’t guess. If the crust puffs too early, tent it with foil to prevent overbrowning. I was skeptical until I tried it: the crust stays crisp, and the filling stays thick.
Storing and reheating this pioneer apple pie
Room-Temp Storage
This pie tastes even better the next day! Store it at room temperature in an airtight container (like a Ceramic Storage Company pie carrier) for up to 3 days.
The crust stays crisp, and the apples soften just enough to release more flavor. I always make a double batch—one for immediate serving and one for later. 🍂
Fridge Refresh
If you need to store leftovers longer than 3 days, refrigerate in an airtight container for up to 5 days. To reheat, warm at 350°F for 15-20 minutes until the filling is hot through.
For extra crispiness, broil for 2-3 minutes at the end. The lattice will puff up beautifully!
Freezer Magic
For long-term storage, freeze the unbaked pie (assembled but unbaked) for up to 3 months. Wrap tightly in plastic wrap followed by foil, then place in a freezer bag.
Bake straight from frozen at 375°F for 60-70 minutes, adding 10-15 minutes to the original time. The ice water in the dough prevents sogginess during freezing. 🧊
Thawing Tips
If freezing a baked pie, thaw overnight in the fridge. For a quicker option, place it on the counter for 2 hours before reheating. Never microwave—it turns the crust rubbery.
I’ve even reheated slices straight from the freezer in a toaster oven for 5 minutes at 375°F for a quick treat.
Lattice Preservation
The lattice design keeps its shape best when stored properly. For short-term storage, leave it uncovered at room temperature. For longer storage, cover loosely with parchment paper to prevent drying.
If the crust loses crispness after reheating, brush with a little melted butter and broil for 1 minute to restore crunch. ✨
Nutrition facts
Frequently asked questions
Why does this recipe use lard instead of butter?
Lard creates that signature flaky, tender crust pioneers relied on—it stays solid longer in warm kitchens and creates perfect layers. The higher fat content also prevents the crust from shrinking during baking. For a modern twist, you can substitute with cold butter, though the texture will be slightly less crisp.
Can I make this pie without a lattice top?
If lattice feels challenging, use a single top crust with a few slits for steam to escape. For extra flair, cut decorative shapes or simply crimp the edges. The filling will still bake beautifully—just expect slightly less visual appeal than the classic lattice.
What if I don't have allspice?
No problem! Skip it or replace with ½ tsp cinnamon + pinch of cloves for similar warmth. The allspice is traditional but not essential—this pie still tastes amazing without it. Focus on balancing the cinnamon and nutmeg for that pioneer spice profile.
How do I know when the apples are perfectly ripe for this recipe?
Look for apples that yield slightly when pressed but aren't mushy. They should be firm with a bright color. Tart varieties like Granny Smith hold their shape best, while sweeter apples like Honeycrisp add natural sweetness. Avoid overripe apples—they'll turn to mush during baking.
Can I bake this in a cast-iron skillet like pioneers did?
Yes! The deep-dish style works beautifully in cast iron. Preheat the skillet for 10 minutes before adding the pie, and bake at 350°F for 1 hour (cover with foil if browning too quickly). The iron distributes heat evenly, creating a crisp bottom crust. Just be careful—it gets hot!