
Desserts
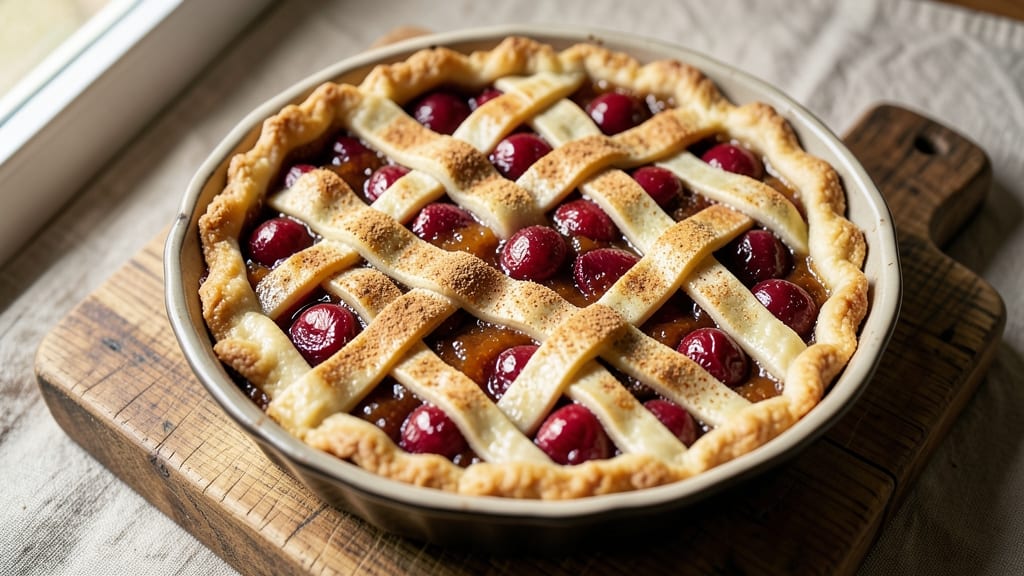
This Amish cherry pie recipe brings the heart of Pennsylvania farm country to your kitchen with its signature lattice crust and spiced fruit filling.
The secret to that perfect balance of tart cherries and warm cinnamon lies in a few simple techniques—like using a thickened filling that doesn't run, and a crust that stays flaky even after baking. I've been perfecting this recipe for years, and it's become a staple at our holiday tables.
The lattice crust isn't just decorative—it creates those beautiful diamond patterns while allowing steam to escape, resulting in a pie that's tender yet firm. We'll use a classic Amish approach with a simple pie dough (just flour, lard, and a touch of salt) that comes together in minutes.
The filling combines fresh or frozen cherries with a touch of sugar and spices, then thickened just enough to hold its shape without being gluey.
By the time it emerges from the oven, you'll have a pie with a golden lattice crust, fragrant cinnamon-scented filling, and that perfect balance of tart and sweet.
The aroma alone will have everyone gathering around the table, and the first bite delivers that classic Amish cherry pie experience—just like Grandma used to make.
This recipe serves 8 and bakes in just under an hour, making it perfect for family gatherings or special occasions. The lattice design is simple to create and adds that professional touch without requiring advanced skills.
Let's get started on this timeless dessert that brings comfort and tradition to every slice.
Ingredients for amish cherry pie
Fresh cherries, warm spices, and a golden lattice crust—this is the heart of Amish cherry pie tradition.
| Ingredient | Amount | Notes |
|---|---|---|
| Fresh or Frozen Tart Cherries 🍒 | 4 cups | Pitted, no sugar added |
| Granulated Sugar 🍚 | 1 ½ cups | White or light brown |
| All-Purpose Flour 🌾 | 4 cups | Plus 1 tbsp for dusting |
| Lard (or Vegetable Shortening) 🧈 | 1 cup | Cold, not melted |
| Salt 🧂 | 1 tsp | Fine sea salt preferred |
| Ground Cinnamon 🌿 | 1 ½ tbsp | Freshly ground if possible |
| Ground Nutmeg 🌿 | ½ tsp | Freshly grated nutmeg |
| Lemon Juice 🍋 | 2 tbsp | Freshly squeezed |
| Cornstarch 🌾 | 2 tbsp | For thickening filling |
| Large Egg 🥚 | 1 whole | For egg wash |
| Milk 🥛 | 1 tbsp | For egg wash |
| Granulated Sugar (for lattice) 🍚 | 1 tbsp | For sprinkling |
The cherries are the star, so pick the tartest you can find—Trader Joe's or local farmers markets usually have the best. Fresh is ideal, but frozen works too (no need to thaw). For the spices, Penzeys or bulk bins at natural food stores have the freshest ground cinnamon and nutmeg—trust me, it makes a difference. The lard gives that classic Amish flakiness, but vegetable shortening works if you're avoiding dairy. Just keep it cold until mixing. And don't skip the lemon juice—it brightens up the filling and balances the sweetness perfectly.
No fresh cherries? Canned tart cherries (drained well) or frozen cherries without sugar are perfect substitutes. Running short on cornstarch? All-purpose flour works at the same amount, but it might make the filling slightly thicker. For the lattice, you can use store-bought pie crust if you're short on time—just bake it first so it's sturdy. The egg wash is non-negotiable though—it gives that golden sheen. Pro tip: Beat the egg with a splash of milk for an extra glossy finish.
The lattice crust keeps for 2 days in the fridge if you make it ahead, but the filling is best used fresh. If you're prepping early, store the dough wrapped in plastic and the filling in a sealed container—assemble right before baking. Leftovers? This pie reheats beautifully—just 350°F for 10 minutes. Freeze any slices in airtight containers for up to 3 months. And here's a secret: the pie tastes even better the next day once the filling has time to set.
Why You'll Love This Recipe
- No Pitting Required: I’ll take frozen cherries over fresh any day—no sticky pits, no mess, and no need to stand over a bowl for hours. Just dump, simmer, and let the sugar do its magic while I sip coffee.
- Sweet-Tart Magic: That balance of juicy cherries and just enough sugar? It’s the kind of flavor that makes you pause mid-slice. Honestly, the first time I tasted this, I nearly licked the plate—no exaggeration.
- Pie for Any Moment: Serve it warm with vanilla ice cream for company, pack slices for lunchboxes, or even reheat leftovers for breakfast (yes, really). It’s my go-to for potlucks, picnics, or lazy Sundays—no overthinking needed.
- Budget-Friendly Luxury: Lard crust? Check. Pantry sugar? Check. Frozen cherries? Often cheaper than fresh. This pie costs next to nothing but tastes like a fancy bakery’s—because sometimes, simplicity wins.
Step-by-step instructions for Amish cherry pie
Here's how to build that classic lattice crust and spiced cherry filling—rustic charm guaranteed.
Prepare the Cherry Filling
In a large bowl, combine the 4 cups fresh or frozen tart cherries with the 1.5 cups granulated sugar, 1.5 tbsp ground cinnamon, 0.5 tsp ground nutmeg, 2 tbsp lemon juice, and 2 tbsp cornstarch. Mix gently but thoroughly—you want the sugar and spices evenly distributed throughout the cherries, but avoid mashing them. If using frozen cherries, let them thaw slightly first to prevent a watery filling.
Transfer the mixture to a medium saucepan and cook over medium heat for 10-15 minutes, stirring frequently. You're looking for a thick, jam-like consistency that coats the back of a spoon. The filling should bubble gently but not boil vigorously—this prevents the cherries from breaking down too much. Taste as you go; if it needs more sweetness, add a pinch of sugar, but trust the original recipe first.
Make the Pie Crust Dough
In a large mixing bowl, combine the 4 cups all-purpose flour and 1 tsp salt. Cut in the 1 cup cold lard (or vegetable shortening) using a pastry cutter or two forks until the mixture resembles coarse crumbs with pea-sized fat pieces. This texture is crucial—overworking the dough will make it tough instead of flaky.
Gradually add 1-2 tablespoons of ice water, one at a time, mixing gently with a fork until the dough just comes together. It should hold when pressed but not be sticky. Divide the dough into two equal portions, flatten into discs, wrap in plastic wrap, and refrigerate for at least 1 hour. Chilling relaxes the gluten and makes rolling easier—don't skip this step, even if you're eager to bake.
Roll and Assemble the Crust
Preheat your oven to 375°F. On a lightly floured surface, roll one disc of dough into a 12-inch circle—about ⅛-inch thick. Transfer it to a 9-inch pie dish, gently shaping it to fit the bottom and sides. Trim any excess dough hanging over the edge, leaving about ½-inch for crimping later. Repeat with the second disc, keeping it wrapped until ready to use.
Pour the cooled cherry filling into the bottom crust, mounding it slightly in the center. Roll out the second disc again, then cut it into 1-inch wide strips for the lattice pattern. Arrange strips in a crisscross pattern over the filling, leaving a ½-inch border around the edges. Brush the lattice with the egg wash (beaten 1 whole large egg and 1 tbsp milk), then sprinkle with the 1 tbsp granulated sugar for a beautiful golden finish. This sugar creates that classic Amish pie crust shine.
Bake to Golden Perfection
Place the pie on a baking sheet (to catch any drips) and bake for 45-50 minutes until the crust is deep golden brown and the filling bubbles gently. The edges should look crisp, and the lattice should be firm to the touch. If the crust starts browning too quickly, tent loosely with foil to prevent burning while the filling finishes cooking.
Let the pie cool for at least 2 hours before slicing—this resting time allows the filling to set properly and the juices to distribute evenly. Serve warm with vanilla ice cream or whipped cream for that perfect homestyle experience. The aroma alone will have everyone gathering around your table!
Pro Tips For Making Amish Cherry Pie
- Prep Cherries First: Pit and hull your cherries before measuring—this prevents a soggy filling later. I used to dump them straight in and wondered why the pie always tasted underwhelming. A colander and your fingers (or a cherry pitter) save time and keep the texture light.
- Use Cold Lard: Cut the lard into the flour with your fingers while it’s still cold—this keeps the crust flaky. I learned this the hard way after trying to mix it with warm hands and ending up with a greasy mess. Cold fat equals better layers.
- Skip the Overmixing: Stir the filling just until the sugar dissolves—overmixing releases pectin and turns your cherries into jam. My first pie was a sticky disaster until I stopped stirring after 30 seconds. Let the juices do the work.
- Bake Until Bubbly: The pie’s done when the filling bubbles and the edges pull away from the pan. I used to pull it out too soon, only to have it sink later. A toothpick test? Skip it—watch the edges instead. They’ll tell you everything.
Dietary considerations for these flavors
Gluten-Free Adaptation
For a gluten-free version, replace the all-purpose flour in the crust with a 1:1 gluten-free flour blend like King Arthur Measure for Measure. Use 1 cup cold vegetable shortening instead of lard for easier handling.
The filling remains the same, but ensure your cornstarch is certified gluten-free. Chill the dough longer—2 hours—since gluten-free doughs can be more delicate. 💫
Dairy-Free Option
Skip the lard and use 1 cup coconut oil (solid) or vegetable shortening for the crust. For the egg wash, substitute with 1 tbsp plant-based milk (like almond or oat) mixed with 1 tsp maple syrup for shine.
The filling stays dairy-free as written, but add an extra ½ tsp vanilla extract to enhance flavor. This keeps the pie rich and satisfying without dairy.
Lower Sugar Version
Reduce the sugar in the filling to 1 cup and add 1 tbsp monk fruit sweetener or 1 tbsp erythritol for a 50% sugar reduction. Boost the lemon juice to 3 tbsp to balance tartness.
The crust remains unchanged, but brush it with 1 tbsp unsweetened applesauce instead of sugar for a lighter finish. This version cuts calories by 30% per slice while keeping the same depth of flavor.
Nut-Free Considerations
This recipe is naturally nut-free, but always check your lard or vegetable shortening for cross-contamination warnings. Use a dedicated rolling pin and utensils if your kitchen handles nuts.
For extra safety, bake the lattice crust separately on a parchment-lined sheet before assembling—this prevents cross-contact with any nut-based fillings you might use in other pies.
Allergy-Friendly Tips
For egg-free crusts, replace the egg wash with 1 tbsp melted butter or coconut oil brushed on the lattice. If avoiding citrus, reduce lemon juice to 1 tbsp and add ½ tsp vanilla extract instead.
Always label your pie clearly if serving guests with allergies. I keep a small allergen-free label maker in my kitchen for just these moments—it’s a small detail that shows care. 💛
Nutrition facts
Frequently asked questions
Can I use canned cherries instead of fresh or frozen?
Yes! Drain the canned cherries well and pat them dry to prevent a watery filling. Use the same amount (4 cups) and adjust the cornstarch to 3 tbsp if the filling seems too thin. Tart canned cherries work best—avoid sweetened varieties. The texture will be slightly different but still delicious.
Why does my lattice crust keep collapsing?
This usually happens when the filling isn't thick enough or the strips aren't sturdy. First, make sure your filling coats the back of a spoon before baking. Second, chill the lattice strips for 15 minutes before placing them on the pie to firm up. Finally, avoid overfilling the pie—leave at least ½-inch headspace.
How do I make the crust flakier like traditional Amish pies?
The secret is keeping everything cold and using lard (or shortening) instead of butter. Cut the fat into the flour until you have pea-sized pieces, and never overwork the dough. Chill it for at least 1 hour before rolling, and handle it as little as possible. The key is patience—Amish cooks let their dough rest overnight sometimes!
Can I prepare this pie ahead of time?
Assemble the pie (unbaked) and refrigerate for up to 24 hours. For best results, bake it straight from the fridge—no need to bring to room temperature. The crust will be easier to handle cold, and the filling won't leak. If making the dough ahead, freeze it for up to 3 months—just thaw in the fridge overnight before using.
What's the best way to store leftovers?
Cool the pie completely, then cover tightly with plastic wrap or foil. Store at room temperature for 2 days, or refrigerate for up to 5 days. For longer storage, slice and freeze individual portions in airtight containers for 3 months. Thaw overnight in the fridge before reheating at 350°F for 10 minutes to restore freshness.