
Desserts
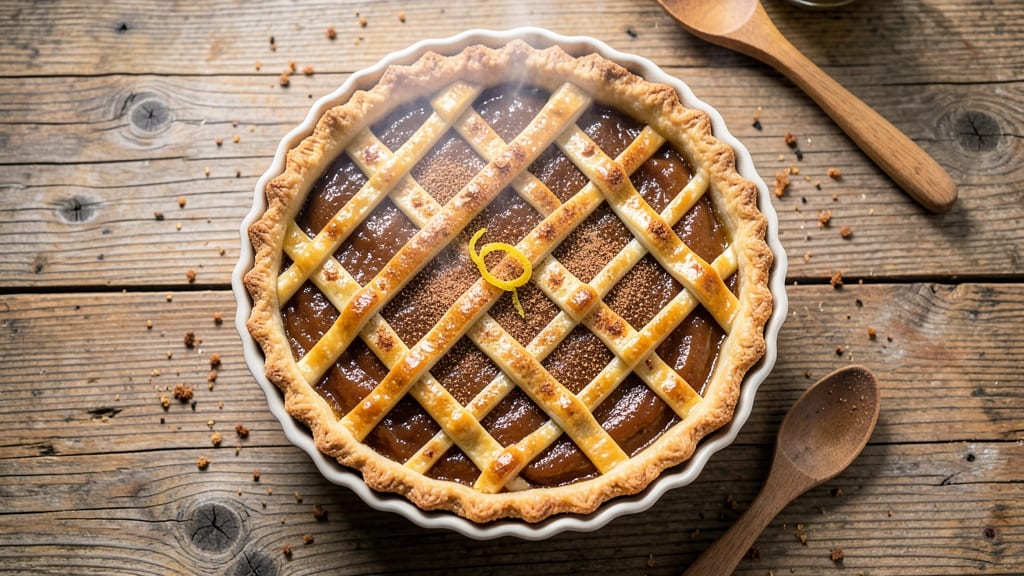
This Amish apple butter pie recipe delivers the comforting flavors of slow-cooked spice and buttery lattice perfection that tastes like autumn in every bite. The secret lies in using traditional Amish apple butter—rich, thick, and packed with cinnamon warmth—that transforms a simple pie into a showstopper.
I've perfected this recipe over years of baking, ensuring the crust stays flaky while the filling stays gooey and aromatic.
The flaky lattice crust is key here, requiring precise rolling and careful cutting to create those signature diamond patterns that let air circulate while keeping the filling tender. This isn't just any pie—it's a labor of love that combines old-world techniques with modern convenience.
The apple butter filling, slow-cooked until thick and fragrant, becomes the heart of this dessert, its deep caramel notes balanced by warm spices.
What you'll end up with is a pie that looks as beautiful as it tastes—golden crust, bubbling filling, and a lattice pattern that's both decorative and functional.
The aroma alone will have everyone gathering in the kitchen, and the first bite delivers that perfect harmony of spiced apple butter and buttery crust. This is the kind of pie that becomes a family tradition.
Serve it warm with a scoop of vanilla ice cream or a dollop of whipped cream for the full experience. The contrast of cold and warm makes every bite unforgettable. Let's get baking—this pie is worth every minute of effort.
Ingredients for amish apple butter pie
Gather these hearty ingredients for a pie that tastes like autumn baked into every bite.
| Ingredient | Amount | Notes |
|---|---|---|
| Amish Apple Butter 🍏 | 2 cups | Homemade or high-quality store-bought |
| All-Purpose Flour 🌾 | 3 cups | Plus 1 tbsp for dusting |
| Unsalted Butter 🧈 | 1 cup | Cold, cubed for flaky crust |
| Granulated Sugar 🍚 | ½ cup | Plus 2 tbsp for sprinkling |
| Large Eggs 🥚 | 1 whole | Room temperature |
| Ice Water 💧 | ¼ cup | For dough elasticity |
| Ground Cinnamon 🌿 | 1 tbsp | Plus extra for dusting |
| Ground Nutmeg 🌿 | ½ tsp | Freshly grated preferred |
| Salt 🧂 | ½ tsp | Fine sea salt |
| Vanilla Extract 🍯 | ½ tsp | Pure vanilla preferred |
| Vanilla Ice Cream 🍦 | 1 ½ cups | For serving (optional) |
| Heavy Whipping Cream 🥛 | ¼ cup | For topping (optional) |
The apple butter is non-negotiable here—homemade is ideal, but brands like Amish Country or Kroger's work in a pinch. Look for apple butter with visible cinnamon flecks and a thick, caramel-like consistency. The flour should be King Arthur or Bob's Red Mill for the best texture (none of that pre-sifted stuff). Butter matters too—Plugrá or Land O'Lakes are reliable, but leave it out overnight to soften. For the spices, McCormick or Penzeys ground cinnamon and nutmeg add depth. I always double-check the nutmeg jar—if it smells stale, toss it.
No vanilla extract? Seeds from a vanilla bean work beautifully—steep them in warm water for 10 minutes first. Short on apple butter? Thick applesauce with extra cinnamon gets you close, but it won't have that same rich depth. The dough can handle substitutions—whole wheat flour at half the amount adds texture, or almond flour for a nutty twist. For the lattice, if you're nervous about cutting perfect strips, use a pizza cutter for cleaner lines. And if you're serving this to a crowd, double the crust recipe—trust me, you'll want seconds.
The dough keeps 3 days wrapped in plastic in the fridge, or 3 months frozen between parchment paper. Apple butter? It lasts 6 months unopened, but once opened, refrigerate and use within 3 months. The finished pie reheats beautifully—20 minutes at 350°F revives it like it's fresh out of the oven. Store leftovers covered at room temp for 2 days, or freeze slices for 1 month. I always make two pies—one for today, one for next week.
Why You'll Love This Recipe
- No-Fuss Filling: I swear, the Amish apple butter does all the heavy lifting here—just spread it, fold in the crust, and bake. No chopping, no peeling, no fuss. The thick, spiced sweetness melts into the flaky layers like it was meant to be there.
- Spiced Comfort in Every Bite: That apple butter? It’s not just sweet—it’s got cinnamon, cloves, and a hint of warmth that makes this pie taste like a hug. The sugar caramelizes just enough to give it that perfect balance between rich and tangy, with the butter crust cutting through like a cool breeze.
- Weeknight or Holiday Table: Honestly, I’ve served this to a crowd of three and a dinner party of twelve—same recipe, same ease. The crust holds up to slicing, the filling stays thick, and it’s just as welcome with a cup of coffee as it is under a scoop of vanilla ice cream. (Yes, even on a Tuesday night.)
- Leftovers That Don’t Let You Down: Between us, this pie actually improves the second day. The crust gets even more tender, and the apple butter flavor deepens—like it’s had time to marinate in the oven. I’ve reheated slices in the microwave, warmed them in the oven, and even packed them for lunch. No one’s ever complained.
Step-by-step instructions for Amish apple butter pie
Here's how to create that perfect balance of spiced apple butter and buttery lattice crust.
Prepare the Filling
Preheat your oven to 350°F. In a medium bowl, combine the 2 cups Amish apple butter, 0.5 cup granulated sugar, 1 tbsp ground cinnamon, 0.5 tsp ground nutmeg, 0.5 tsp salt, and 0.5 tsp vanilla extract. Stir until everything is well mixed and the spices are evenly distributed throughout the apple butter. This mixture should be thick but spreadable—think of it like a spiced apple butter glaze.
Spread the filling evenly into a 9-inch pie dish, creating a thin layer that covers the bottom and sides. The filling should be about ¼-inch thick—this ensures even baking and prevents a soggy crust. I like to use a rubber spatula to smooth out any lumps and create an even surface. This step is crucial for that classic Amish pie look and texture.
Make the Pie Crust
In a large bowl, combine the 3 cups all-purpose flour, 0.5 tsp salt, and 0.5 tsp ground nutmeg. Cut in the 1 cup cold unsalted butter using a pastry cutter or your fingers until the mixture resembles coarse crumbs with pea-sized butter pieces. This texture is essential for creating a flaky crust.
Gradually add the 0.25 cup ice water, 1 tablespoon at a time, mixing gently just until the dough comes together. Be careful not to overmix—the dough should hold together when pressed but still be slightly crumbly. Divide the dough into two equal parts, flatten each into a disk, wrap in plastic wrap, and refrigerate for at least 1 hour. Chilling helps the gluten relax, making the crust easier to roll out and preventing shrinking during baking.
Roll and Assemble the Crust
Roll out one disk of dough on a lightly floured surface to fit your pie dish, about 12 inches in diameter. Transfer the dough to the pie dish and press it gently into the bottom and up the sides. Trim any excess dough, leaving about ½ inch overhang. This will help seal the edges when you add the top crust.
Roll out the second disk of dough to create strips about 1 inch wide. Arrange these strips in a lattice pattern over the filling, alternating directions for a classic look. Brush the top crust with a little beaten egg to help it brown nicely. Sprinkle the remaining 2 tbsp granulated sugar over the lattice for extra sweetness and color during baking.
Bake to Golden Perfection
Place the assembled pie on a baking sheet lined with parchment paper to catch any drips. Bake in the preheated oven for 45-50 minutes until the crust is deep golden brown and the filling is bubbling gently. The edges should be set, but the center might still look slightly soft—this is normal and will firm up as it cools.
Remove the pie from the oven and let it cool on a wire rack for at least 2 hours. This resting period allows the filling to set properly and the crust to firm up. The aroma of warm apple butter and cinnamon will fill your kitchen—trust me, it's worth the wait. Serve warm with 1.5 cups vanilla ice cream and a dollop of 0.25 cup heavy whipping cream for the ultimate Amish pie experience.
Pro Tips For Making Amish Apple Butter Pie
- CHILL THE APPLE BUTTER: Warm apple butter thickens as it cools—pour it straight from the jar while still room temperature, then let it sit for 10 minutes before filling the pie. I learned this the hard way after my first batch slid right out of the crust like a sad puddle.
- USE COLD BUTTER FOR CRUST: Cut that unsalted butter into flour using a pastry cutter (or your fingers, no judgment) until it resembles coarse crumbs with pea-sized pieces. Skip the food processor—it turns the dough greasy, and you’ll end up with a soggy bottom. Trust me, your crust will thank you.
- SKIP THE OVERMIXING: Once you add the egg to the crust mixture, stir just until the dough holds together. Overmixing develops gluten, and that’s how you get a tough, chewy crust instead of the tender, flaky layers you’re after. Two or three quick folds are all it takes.
- BAKE UNTIL GOLDEN, NOT JUST SET: The pie’s done when the crust is deep golden brown, not when the filling’s just looking set. If the edges brown too fast, cover them with foil early and focus the heat on the center. A toothpick test is fine, but don’t pull it out too soon—apple butter takes longer to firm up than you’d think.
Pro cooking tips for amish apple butter pie
Perfect Lattice Mastery
For that signature Amish lattice pattern, roll out your second dough disk to about 1/8-inch thickness—thinner than the bottom crust. Use a pizza cutter for clean strips (about 1-inch wide), then weave them in a checkerboard pattern starting from the outer edge.
I press each strip gently with my thumb to seal the edges where they overlap. For extra flair, brush the lattice with egg wash before baking—it creates golden highlights that make the pie look like it came from a bakery. 🌟
Apple Butter Consistency
Thick, spreadable apple butter is non-negotiable—if yours is too runny, simmer it uncovered for 10-15 minutes to thicken. I like to stir in an extra ½ teaspoon cinnamon and ¼ teaspoon nutmeg to the filling before baking to intensify the spice aroma.
For a smoother finish, press the filling through a fine-mesh sieve to remove any lumps. The goal is a velvety texture that coats the back of a spoon.
Crust Temperature Control
Your oven’s temperature probe is your best friend here. The crust needs to reach 375°F internally (measured with an infrared thermometer) for perfect flakiness. If your oven runs hot, reduce the temperature to 325°F and add 5-10 minutes to the bake time.
I always preheat my oven for 30 minutes with a baking sheet on the lower rack to ensure even heat distribution. A light-colored pie dish (like ceramic) bakes faster than dark metal—adjust accordingly.
Baking Time Secrets
Don’t rush the bake! The pie is done when the lattice edges are deep golden brown and the filling is just starting to bubble at the edges.
If the center looks underdone after 45 minutes, tent the pie with foil and bake for another 10 minutes—this prevents over-browning while ensuring even cooking.
I pull mine from the oven when the crust is set but still slightly soft to the touch; it’ll firm up as it cools. 🔥
Resting for Success
Skipping the 2-hour rest is the fastest way to a soggy bottom. The filling needs time to set, and the crust needs to crisp up. I place my pie on a wire cooling rack (not the counter) to allow air circulation.
If you’re short on time, chill the pie in the fridge for 1 hour—it’ll still be delicious, just slightly firmer. Pro tip: Brush the warm crust with melted butter after baking for extra richness.
Reheating Like a Pro
Reheating pie is an art! For a stovetop refresh, cover the pie with foil and warm on low heat for 10-15 minutes—this keeps the crust tender. For the oven method, bake at 350°F for 20 minutes with a ½ cup water in the pan to create steam.
Microwaving? Never—it turns the crust rubbery. Instead, heat slices in a dry skillet over medium heat for 2-3 minutes per side until golden. 💫
Nutrition facts
Frequently asked questions
Can I make this pie without a lattice crust?
The lattice is traditional and creates that beautiful Amish look, but you can substitute with a solid top crust or even a crumb topping. For a crumb version, mix 1 cup flour, ½ cup brown sugar, ½ cup cold butter, and 1 tsp cinnamon, then sprinkle over the filling before baking. The texture will be different but still delicious!
How do I store leftovers to keep the crust crisp?
Store slices in an airtight container at room temperature for up to 2 days. For longer storage, freeze slices wrapped in plastic for 1 month. To reheat, warm in a 350°F oven for 10-15 minutes with a ½ cup water in the pan to prevent drying. Never microwave—it makes the crust soggy!
What's the secret to making the apple butter filling extra flavorful?
Slow-cook your apple butter until it's thick and caramelized—this develops deeper flavors. For extra richness, stir in 1 tsp vanilla bean paste or ½ tsp cardamom to the filling before baking. Also, use high-quality spices like freshly ground cinnamon and nutmeg for the best aroma and taste.
Can I make this pie ahead of time?
Assemble the pie (unbaked) and refrigerate for up to 24 hours before baking. For a make-ahead dessert, bake the pie, then cool completely and store wrapped at room temperature for 3 days. Reheat slices as needed—this is perfect for holiday gatherings where you want to serve warm pie!
Why did my crust turn out tough instead of flaky?
Overworking the dough or using warm butter are common culprits. Keep everything cold and handle the dough minimally. For extra flakiness, chill the dough for 2+ hours and use cold butter (not softened). Also, avoid overfilling the crust—too much filling can weigh it down and make it tough.