
Desserts
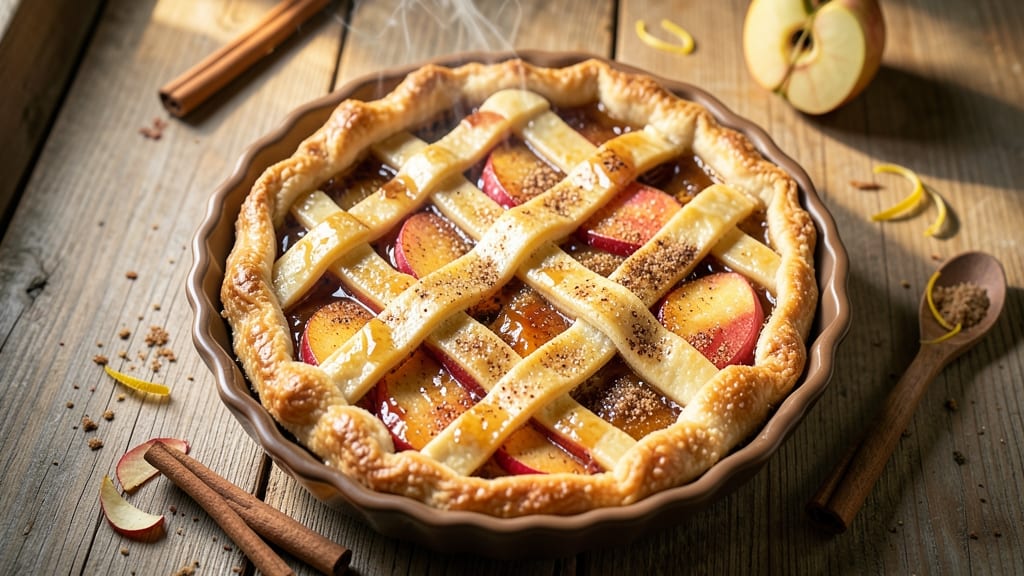
This ambrosia apple pie recipe delivers the perfect balance of crispy lattice crust and spiced fruit filling that tastes like autumn in every bite.
The secret lies in using ambrosia apples—firm enough to hold their shape yet tender enough to melt in your mouth—paired with a buttery, flaky crust that bakes to golden perfection. I've perfected this recipe over years of baking, ensuring the crust stays crisp while the filling remains juicy and aromatic.
What sets this recipe apart is the lattice topping, which creates a beautiful, intricate pattern while allowing steam to escape, keeping the filling moist. The spiced filling combines ambrosia apples with cinnamon, nutmeg, and a touch of brown sugar for depth, creating layers of warm, comforting flavors.
The crust is made from scratch using cold butter and all-purpose flour, a foolproof method that guarantees a tender yet crispy texture every time.
By the time you pull this pie from the oven, you'll have a dessert that looks as impressive as it tastes—golden crust, fragrant filling, and a lattice pattern that makes it perfect for serving at gatherings or enjoying as a cozy treat on a chilly evening.
The aroma alone will have everyone asking for seconds, and the combination of crispy crust and tender fruit makes each bite unforgettable.
Serve it warm with a scoop of vanilla ice cream or a drizzle of caramel for an extra touch of indulgence. This recipe is designed to impress without being overly complicated, making it ideal for both beginners and experienced bakers alike.
Let's get started on creating a pie that will become a family favorite.
Ingredients for ambrosia apple pie
Eight ingredients for the filling, six for the crust—everything you need for a showstopping ambrosia apple pie.
| Ingredient | Amount | Notes |
|---|---|---|
| Ambrosia Apples 🍎 | 6 medium | Peeled, cored, sliced 1/4-inch thick |
| All-Purpose Flour 🌾 | 3 ½ cups | For crust and filling |
| Unsalted Butter 🧈 | 1 cup | Cold, cubed for crust |
| Granulated Sugar 🍚 | 1 ½ cups | For filling and crust |
| Light Brown Sugar 🍚 | ½ cup | Packed, for filling |
| Ground Cinnamon 🌿 | 2 tbsp | For filling and crust |
| Ground Nutmeg 🌿 | ½ tsp | Freshly grated preferred |
| Salt 🧂 | 1 tsp | Kosher or sea salt |
| Lemon Juice 🍋 | 1 tbsp | Freshly squeezed |
| Ice Water 💧 | ½ cup | For dough consistency |
| Vanilla Extract 🌸 | 1 tsp | Pure vanilla preferred |
| Large Egg 🥚 | 1 whole | For egg wash |
Ambrosia apples are the star here, and local orchards or specialty grocery stores are your best bet for the freshest, firmest fruit. Look for apples that yield slightly when pressed but don’t feel mushy—they should hold their shape during baking. If you can’t find ambrosia, Honeycrisp or Braeburn are excellent substitutes. The butter for the crust needs to be cold and cubed—don’t let it warm up, or your lattice will turn out greasy instead of flaky. I always buy European-style butter like Plugrá or Land O’Lakes for the highest fat content, which guarantees that perfect flakiness. If you’re short on time, pre-peeled, cored apples from the produce section save steps, though fresh is always better.
No ambrosia apples? Granny Smith or Fujis add tartness to balance the sweetness, but they’ll break down faster during baking. Running low on brown sugar? White sugar plus 1 tsp molasses works in a pinch, though the flavor won’t be identical. The cinnamon should be freshly ground—pre-ground loses potency quickly, and that dulls the warm spice notes. If you’re making this ahead, store the dough separately from the filling in the fridge for up to 2 days, or freeze the dough for 3 months. The filling can sit at room temperature for a few hours before baking, which actually helps the flavors meld—just don’t let it get too warm.
The dough keeps best in the fridge for 2 days wrapped tightly in plastic, or you can freeze it for up to 3 months. Once baked, the pie stays fresh at room temperature for 2 days, but it’s best enjoyed within 48 hours for that perfect balance of crisp crust and tender fruit. If you’re prepping ahead, bake the crust without the filling first, then add the filling later and finish baking—this prevents a soggy bottom. Store leftovers in an airtight container, and reheat slices in the oven at 350°F for 10 minutes to restore that fresh-baked magic.
Why You'll Love This Recipe
- No Peel, No Stress: I swear by these apples—they stay firm when baked, so you skip the tedious peeling and coring. Just slice, toss with sugar, and let the oven work its magic while you sip coffee.
- Sweet-Spiced Magic: That caramelized brown sugar crust meets tender apples with a hint of cinnamon (trust me, it’s in there). The buttery flaky top? Absolute comfort in every bite—like dessert hugs your taste buds.
- Weeknight Hero: Between us, this is my go-to when I need something impressive but not labor-intensive. Serve warm with vanilla ice cream, or pack slices for lunch—no reheating needed, just pure nostalgia.
- Budget-Friendly Luxury: Ambrosia apples are often cheaper than fancy varieties, and this recipe stretches to feed six with leftovers that taste just as good cold. Honestly, the only thing costlier is the joy of watching someone’s face when they try it.
Step-by-step instructions for ambrosia apple pie with crispy lattice crust
Here's how to build a pie with a perfectly crisp lattice crust and tender spiced apple filling.
Prepare the Ambrosia Apple Filling
In a large mixing bowl, combine the 6 medium peeled and sliced Ambrosia apples with the 1.5 cups granulated sugar, 0.5 cup packed light brown sugar, 2 tablespoons ground cinnamon, 0.5 teaspoon ground nutmeg, and 1 tablespoon freshly squeezed lemon juice. Toss gently until every apple slice is evenly coated with the spice mixture.
Transfer the apple mixture to a 9-inch pie dish and arrange the slices in an even layer, slightly overlapping them as needed. This arrangement ensures even baking and prevents gaps where filling might spill over. Press down lightly on the apples to create a compact filling—this helps maintain their shape during baking and prevents the crust from puffing up unevenly.
Cover the pie dish with plastic wrap and refrigerate for at least 30 minutes. This chilling step allows the apples to release some moisture, which helps create a thicker, more flavorful filling when baked. The cold apples also prevent the crust from absorbing too much moisture during the initial baking stages, ensuring that crisp texture we're after.
Make the Pie Crust Dough
In a large bowl, combine the 3.5 cups all-purpose flour, 1 teaspoon salt, and 1 tablespoon granulated sugar. Cut in the 1 cup cold cubed unsalted butter using a pastry cutter or your fingers until the mixture resembles coarse crumbs with pea-sized butter pieces remaining. This texture is crucial for creating flaky layers in the final crust.
Add the 0.5 cup ice water, 1 teaspoon vanilla extract, and mix gently with a fork until the dough just comes together. Be careful not to overmix—just combine until the dough forms a shaggy mass. Turn the dough out onto a lightly floured surface and divide it into two equal portions. Shape each portion into a disk, wrap in plastic wrap, and refrigerate for at least 1 hour.
This resting period allows the gluten to relax, which prevents the crust from shrinking during baking. Cold dough also handles better when rolling, reducing the risk of cracking. The butter remains firm, which is essential for creating those beautiful flaky layers when baked.
Roll Out and Assemble the Crust
Preheat your oven to 375°F. On a lightly floured surface, roll out one of the chilled dough disks into a 12-inch circle, about 1/8-inch thick. Transfer the rolled dough to a 9-inch pie dish, gently pressing it into the bottom and up the sides. Trim any excess dough hanging over the edge, leaving about 1/2-inch overhang.
Roll out the second dough disk into a 12-inch circle. Using a sharp knife or pizza cutter, cut the dough into 1-inch wide strips. Arrange half the strips horizontally across the top of the filled pie, spacing them about 1/2-inch apart. Fold the overhanging crust edges inward to create a decorative border, then fold the horizontal strips up at a 45-degree angle to create the lattice pattern.
Add the remaining vertical strips, again spacing them about 1/2-inch apart. Gently press down on the strips to seal them to the bottom crust. Brush the lattice and bottom crust with the beaten whole large egg mixed with 1 tablespoon water for the egg wash. This creates a golden, glossy finish and helps seal the crust for a crisp texture.
Bake to Golden Perfection
Place the assembled pie on a baking sheet lined with parchment paper to catch any drips. Bake in the preheated 375°F oven for 45-50 minutes, or until the crust is deep golden brown and the filling is bubbling gently. The edges should be crisp, and you should see a slight pull away from the sides of the pie dish.
During the last 10 minutes of baking, place a sheet pan filled with 1 inch of hot water on the lower oven rack. This creates steam that helps prevent the crust from becoming too dry. If the crust starts to brown too quickly, tent it loosely with aluminum foil to protect it while the filling finishes cooking.
Remove the pie from the oven and let it cool on a wire rack for at least 2 hours before slicing. This resting period allows the filling to set and the juices to redistribute, ensuring each slice has that perfect balance of crisp crust and tender, flavorful filling. The pie will continue to release its aroma as it cools, filling your kitchen with the irresistible scent of freshly baked Ambrosia apple pie.
Pro Tips For Making Ambrosia Apple Pie
- Peel Apples Thinly: Ambrosia apples are tart and firm—don’t strip them bare like a Granny Smith. Aim for a 1/4-inch peel; too thin, and the filling gets watery, too thick, and the texture turns mushy. I learned this the hard way after a soggy bottom crust.
- Brown the Butter First: That nutty, caramelized butter in the crust isn’t just for flavor—it adds depth. Melt the butter, then cook it until it’s golden and smells like toasted nuts before mixing in the flour. Skip this, and your crust will taste flat, even if everything else is perfect.
- Don’t Overmix the Dough: Cut cold butter into flour until it’s pea-sized, then stop. Overworking the dough develops gluten, and your crust will end up tough instead of flaky. Use a fork or your fingers—just until it holds together when pressed. (Yes, it’ll look shaggy. That’s fine.)
- Chill the Filling: After tossing the apples with sugar, let the filling sit in the fridge for at least 30 minutes. The cold slows down the release of juices, so your crust doesn’t turn soggy while baking. I used to skip this and always ended up with a messy bottom.
Storing and reheating your leftovers
Refrigerator Storage
Your freshly baked ambrosia apple pie stays fresh in the refrigerator for up to 4 days when stored in an airtight container or wrapped tightly with plastic wrap and aluminum foil. I always let it cool completely first to prevent condensation from making the crust soggy.
Place it on a wire rack before transferring to storage—this keeps the bottom crust crisp rather than damp. 🍎
Freezer Prep Tips
For long-term storage, bake the pie crust without the filling, then freeze it wrapped in plastic wrap and foil for up to 3 months. When ready to bake, thaw overnight in the fridge, add your chilled filling, and bake as directed.
Alternatively, freeze the unbaked pie (with filling) for 2 months—just add 10-15 minutes to the baking time when thawed. Label with the date to track freshness!
Oven Reheating
To revive that fresh-baked magic, reheat slices in a 350°F oven for 10-12 minutes on a baking sheet. This restores the crust’s crispness while gently warming the filling. For extra shine, brush slices with melted butter before reheating.
Avoid the microwave—it turns the crust rubbery and the filling watery. A cast-iron skillet over medium heat also works for quick reheating!
Make-Ahead Filling
Prep the apple filling 1 day ahead and store it in an airtight container in the fridge. The flavors deepen overnight, and the apples soften slightly, creating a thicker filling. When ready to bake, assemble the pie as directed and add 5 minutes to the baking time.
This trick saves time on busy days while enhancing flavor. Just ensure the filling is at room temperature before adding to the crust!
Serving Warm
For the best experience, serve slices warm with a scoop of vanilla ice cream or a drizzle of caramel sauce. The contrast of cold and warm creates a perfect balance. I like to reheat individual slices in the oven while keeping the pie covered to maintain moisture.
If storing leftovers, keep them in the fridge for up to 3 days—just reheat before serving for that restaurant-quality texture. 💛
Nutrition facts
Frequently asked questions about ambrosia apple pie
What makes ambrosia apples different from other apple varieties?
Ambrosia apples are prized for their firm yet tender texture and slightly sweet-tart flavor, making them perfect for baking. Unlike Granny Smiths (tart) or Honeycrisp (crisp), they hold their shape beautifully during baking while developing a melt-in-your-mouth consistency. Their natural sweetness also means you need less added sugar in the filling.
Can I substitute ambrosia apples if I can't find them?
Yes! Honeycrisp or Braeburn apples work best as substitutes—they hold their shape and have similar sweetness. For tartness, use Granny Smith but reduce sugar by 0.25 cup to balance the flavor. Avoid overly soft apples like McIntosh, as they'll break down too much during baking.
Why does my lattice crust sometimes puff up or collapse?
This usually happens when the filling isn't properly chilled before baking or if the strips aren't sealed tightly to the bottom crust. Always refrigerate the filled pie for 30 minutes before baking, and press the lattice strips firmly against the edges. If the crust puffs, it means the filling released too much steam too quickly—try baking at 350°F instead of 375°F next time.
How do I prevent a soggy bottom crust?
The key is to pre-bake the crust for 10 minutes before adding filling, or use a pie crust shield to block bottom heat. For extra insurance, sprinkle 1/4 cup of crushed cornflakes or oats on the bottom crust before adding filling—they absorb excess moisture. Always let the pie cool completely before slicing to allow the filling to set properly.
Can I make this pie ahead of time for a holiday gathering?
Bake the pie 1 day ahead and store it at room temperature in an airtight container. For best results, reheat slices in a 350°F oven for 10 minutes before serving to restore crispness. The flavors actually improve overnight as the spices meld. If you're prepping for a large event, consider baking two mini pies instead of one large one—they heat up faster and serve better.