
Desserts
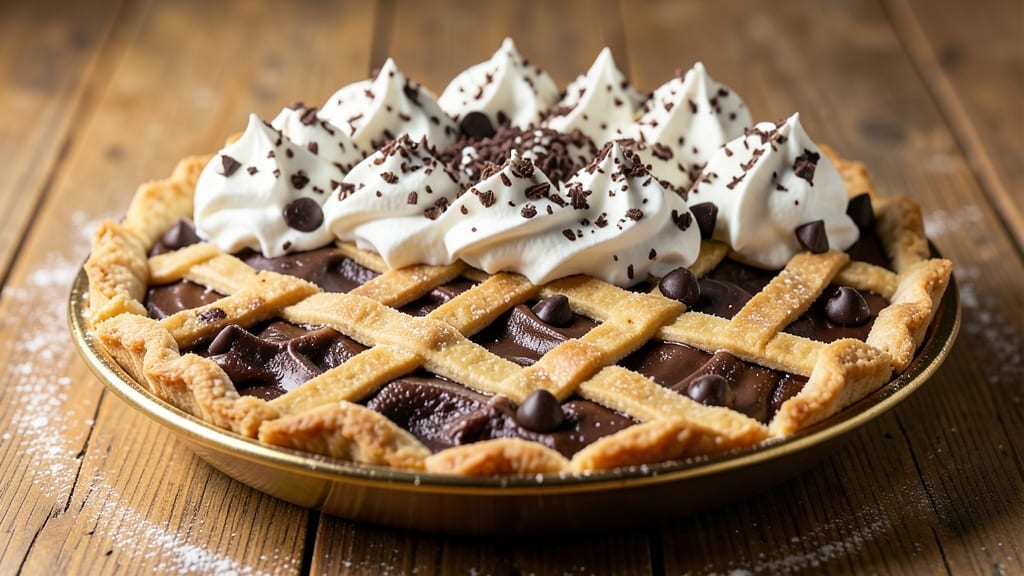
This amazing chocolate pie recipe delivers the kind of deep cocoa richness that makes every slice feel like a decadent treat. 💛 The secret lies in a crispy graham cracker crust that holds up perfectly against the velvety chocolate filling, while the baking process ensures a smooth, fudgy center with just the right amount of set.
I've been perfecting this recipe for years, and it never fails to impress—whether you're serving it at a dinner party or just craving a slice of pure chocolate bliss.
The crust starts with crushed graham crackers mixed with melted butter and a touch of sugar, pressed into the pie dish for that signature crispy texture you can't get enough of.
Meanwhile, the filling combines rich chocolate, eggs, cream, and a hint of vanilla for that classic chocolate pie flavor—no artificial ingredients, just pure cocoa goodness. Baking at 350°F for 45-50 minutes ensures the filling sets just right, creating that perfect balance between creamy and firm.
What makes this pie truly amazing is how it looks and tastes straight out of the oven—golden edges on the crust, a glossy chocolate top, and a clean slice that reveals that luscious, fudgy center.
The aroma alone will have everyone gathering around, and the first bite delivers that satisfying contrast of crispy crust and silky filling. It's the kind of dessert that feels like a hug in every bite, and it's easier to make than you might think.
For an extra touch of elegance, you can add a dusting of powdered sugar or a drizzle of melted chocolate before serving. This pie keeps well in the fridge for up to 5 days, making it perfect for meal prep or gifting. Let's get baking—you won't regret it!
Ingredients for amazing chocolate pie
Graham crackers, rich chocolate, and velvety cream—these are the stars of this decadent dessert.
| Ingredient | Amount | Notes |
|---|---|---|
| Graham Crackers 🍪 | 2 cups | Crushed into fine crumbs |
| Unsalted Butter 🧈 | ½ cup | Melted, full-fat preferred |
| Granulated Sugar 🍚 | ¼ cup | For crust sweetness |
| Dark Chocolate Chips 🍫 | 12 oz | 70% cocoa or higher |
| Large Eggs 🥚 | 2 whole | Room temperature |
| Heavy Cream 🥛 | 1 cup | Full-fat for richness |
| Vanilla Extract 🌿 | 1 tsp | Pure extract preferred |
| Powdered Sugar 🍚 | ¼ cup | For dusting |
| Salt 🧂 | ½ tsp | Fine sea salt |
| Vegetable Oil 🫒 | 2 tbsp | For greasing pie dish |
| Semisweet Chocolate Chunks 🍫 | ½ cup | Optional for extra richness |
The graham crackers make or break the crust. Honey Maid or Keebler are my go-to brands—they crush perfectly. If you're using homemade graham crackers, pulse them in a food processor for ultra-fine crumbs. The butter needs to be melted but not hot—just warm enough to coat the crumbs. Melt it in the microwave for 40 seconds, then let it cool slightly before mixing. Pro tip: Press the crust into the pie dish and chill for 15 minutes before baking—this prevents cracking when you add the filling later. The chocolate chips? Ghirardelli or Lindt are worth the splurge for that deep cocoa flavor.
No dark chocolate chips? High-quality cocoa powder plus extra sugar works in a pinch—just melt it with the butter first. Running low on eggs? Flax eggs (1 tbsp ground flaxseed + 3 tbsp water = 1 egg) keep it vegan-friendly while maintaining structure. The heavy cream can be swapped for full-fat coconut milk if you're avoiding dairy, though the texture will be slightly lighter. For an extra touch, fold in those semisweet chocolate chunks at the end—they melt beautifully and add pockets of gooey goodness. If you're making this ahead, prep the crust and filling separately and assemble right before baking.
This pie tastes even better the next day—trust me, the flavors meld perfectly. Store it in the fridge for up to 5 days, covered tightly. To serve, let it sit at room temperature for 10 minutes so the filling softens slightly. The crust stays crispy for days, but if it starts to soften, pop it back in the oven at 350°F for 5 minutes. For gifting, slice it and wrap each piece in parchment paper—it travels beautifully. Freeze the whole pie (without the crust) for up to 3 months if you're prepping ahead.
Why You'll Love This Recipe
- No-Fuss Crust: Crushing graham crackers with melted butter takes two minutes—no rolling, no fuss, just that perfect buttery crunch. Honestly, I’ve tried fancy pie dough, and this wins every time for how effortless it is.
- Rich Without Guilt: Dark chocolate chips and eggs create a velvety filling that’s decadent but not heavy. The sugar caramelizes just enough to balance that deep chocolate bite—like a hug for your taste buds.
- Party-Proof Pie: This holds up for potlucks, last-minute dessert dates, or even breakfast-for-dinner (yes, really). Between us, I’ve served it warm with whipped cream at book club and cold with ice cream at family dinners—it’s that adaptable.
- Budget Magic: Uses pantry staples you already own—no specialty ingredients, no markup. The graham crackers alone stretch the cost, and the leftovers? They disappear faster than I can say “second slice.”
Step-by-step instructions for deep cocoa richness with crispy crust
Here's how to build a pie with layers of buttery crunch and fudgy chocolate perfection.
🍳 Step 1: Create the Ultimate Crust Foundation
Preheat your oven to 350°F and grease a 9-inch pie dish with 2 tablespoons vegetable oil. This prevents sticking and makes removal effortless later. In a food processor, pulse the 2 cups graham crackers until you get fine crumbs - they should resemble wet sand. I like to add the crumbs in batches to avoid over-processing.
Add the 0.5 cup melted unsalted butter and 0.25 cup granulated sugar to the crumbs. Pulse until everything comes together like wet sand. Press this mixture firmly into the prepared pie dish, using your fingers to create an even layer. I press down gently but firmly - you want a solid base that won't crumble when you add the filling. The edges should be about ½-inch thick all around.
🔥 Step 2: Bake the Crust Until Golden and Set
Bake the crust for 10-12 minutes until the edges are golden brown and the center feels firm when touched. Watch carefully after the first 8 minutes - the crust can go from perfect to burnt in seconds. I like to rotate the pie dish halfway through for even baking. Remove from the oven and immediately reduce the heat to 325°F - we'll need that lower temperature for the filling.
While the crust bakes, line the bottom with a round of parchment paper. This creates a barrier that prevents the chocolate from sticking to the crust. Press the parchment gently into the bottom and up the sides about 1 inch. The parchment will make cleanup a breeze later.
👨🍳 Step 3: Melt Chocolate and Prepare the Filling
In a heatproof bowl set over a pot of simmering water (double boiler), melt the 12 oz dark chocolate chips and 0.5 cup semisweet chocolate chunks together. Stir gently until completely smooth, then remove from heat. The mixture should be glossy and silky - if it looks grainy, strain it through a fine-mesh sieve for perfect texture.
In a separate bowl, whisk together the 2 room temperature large eggs, 1 cup heavy cream, 1 tsp vanilla extract, and 0.5 tsp salt until fully combined. Slowly pour the melted chocolate into the egg mixture while whisking continuously. This gradual combination prevents the eggs from scrambling. The final mixture should be thick and glossy with a rich chocolate color.
🥘 Step 4: Assemble and Bake the Perfect Chocolate Layer
Pour the chocolate filling over the parchment-lined crust, spreading it evenly to the edges. The filling should reach about ¼-inch from the top edge. Gently tap the pie dish on the counter to release any air bubbles that might have formed. Return to the oven and bake for 40-45 minutes until the center is just set but still slightly jiggly - it will continue firming up as it cools.
I know it's tempting to check early, but resist! The pie is done when the edges are set and the center has a slight wobble. Remove from the oven and let cool completely on a wire rack - this prevents condensation from forming on top. Once cool, carefully remove the parchment liner.
⏰ Step 5: Dust and Serve for Maximum Wow Factor
Sift the 0.25 cup powdered sugar evenly over the cooled pie. This adds that professional touch and balances the richness. Let it sit for 5 minutes so the sugar adheres to the surface. For serving, slice into 8 equal wedges using a sharp knife - dip the knife in hot water and wipe dry between cuts for clean slices.
Here's the thing about this pie - it tastes even better the next day when the flavors have fully melded. The crust stays crispy, the filling becomes more fudgy, and the powdered sugar dusting creates that perfect contrast. Serve with whipped cream or fresh berries for the ultimate indulgence.
Pro Tips For Making Amazing Chocolate Pie
- MELT CHOCOLATE LOW: Heat the chocolate chips and butter together over a double boiler or in 30-second bursts in the microwave, stirring between each. I learned this the hard way—direct heat burns chocolate faster than you can blink, and once it seizes, you’re starting over.
- CRUSH CRACKERS FINE: Pulse graham crackers in a food processor until they’re like confectioners’ sugar, not sand. I used to skip this, and the crust always tasted like it was missing something—turns out, surface area matters more than you’d think.
- WHISK EGGS COLD: Chill the eggs and sugar in the fridge for 10 minutes before whipping. Warm eggs whip up faster but lose structure, and your pie filling will end up grainy instead of silky—trust me, this small pause makes a real difference.
- BAKE UNTIL JIGGLY: Pull the pie out when the center still wobbles like a Jell-O shot. Overbaking turns that perfect custard into sad, rubbery goo—your pie needs that uncooked bounce to stay rich and luscious.
Perfect pairings for this dish
Classic Whipped Cream
Freshly whipped heavy cream with a pinch of vanilla extract and powdered sugar is the ultimate classic pairing. Whip 1 cup heavy cream with 1 tablespoon powdered sugar and ½ teaspoon vanilla until soft peaks form.
The cool, airy texture contrasts beautifully with the warm, fudgy pie. I like to add a sprinkle of cocoa powder to the whipped cream for an extra chocolatey touch. 🥛
Fresh Berries
Tart berries like strawberries or raspberries cut through the richness of the chocolate perfectly. Arrange a small handful of berries on each slice for a pop of color and freshness. I recommend 1 cup mixed berries tossed with a squeeze of lemon juice to keep them vibrant.
The acidity balances the sweetness, making every bite feel like a dessert masterpiece. 🍓
Caramel Drizzle
For an indulgent twist, drizzle warm homemade caramel over the pie before serving. Use about ¼ cup caramel sauce per pie, letting it pool slightly in the center for a decadent finish.
I make my caramel with 1 cup granulated sugar and ½ cup heavy cream, cooked until golden and smooth. The salty-sweet contrast elevates the chocolate flavor to new heights. 🍯
Espresso or Coffee
A shot of espresso or a cup of strong coffee enhances the chocolate notes in this pie. The bitterness of coffee brings out the deep cocoa flavors, making each bite taste even more luxurious.
I love serving this pie with a small espresso martini for an adult twist. For a non-alcoholic option, a cold brew concentrate drizzle adds a sophisticated touch. ☕
Chocolate Ganache
For an extra layer of chocolate, top each slice with a small dollop of chocolate ganache. Melt 4 oz dark chocolate with ¼ cup heavy cream and let it cool slightly before drizzling.
The ganache adds richness and a glossy finish that makes the pie look even more impressive. I like to add a pinch of sea salt to the ganache for a sophisticated flavor balance. 🍫
Warm Vanilla Ice Cream
Serve a scoop of vanilla ice cream alongside each slice for a nostalgic, comforting pairing. The cold ice cream contrasts with the warm pie, creating a perfect balance of temperatures. I recommend homemade vanilla bean ice cream for the best flavor, but store-bought works in a pinch.
The creamy texture also helps soften the crust slightly, making every bite even more enjoyable. 🍦
Nutrition facts
Frequently asked questions
Can I make this pie without eggs?
Yes! For a vegan version, replace the 2 eggs with 2 flax eggs (mix 2 tbsp ground flaxseed with 6 tbsp water and let sit for 5 minutes to thicken). The texture will be slightly denser but still delicious. For extra richness, add 1 tbsp melted coconut oil to the filling.
How do I prevent the crust from getting soggy?
The key is baking the crust first for 10-12 minutes until golden, then lining it with parchment paper before adding the filling. After baking, let the pie cool completely on a wire rack—this prevents condensation from forming on top. For extra insurance, brush the baked crust with a thin layer of apricot jam before adding the filling.
Can I use a different type of crust?
A classic pie dough crust or chocolate cookie crust (made with crushed Oreos or chocolate sandwich cookies) works beautifully. For a nutty twist, try a pecan crust with 1 cup chopped pecans mixed into the graham cracker crumbs. Just adjust baking times—pie dough may need 15-18 minutes to fully bake.
Why did my pie turn out too firm?
Overbaking is the most common cause. The filling should have a slight wobble in the center when done—it will firm up as it cools. If your pie is too firm, try reducing the baking time by 5 minutes next time. For a creamier texture, slightly underbake the pie and let it set at room temperature for 1 hour before refrigerating.
How do I store leftovers?
Store the pie in an airtight container in the fridge for up to 5 days. For longer storage, freeze the pie (without the crust) for up to 3 months. To reheat, let it sit at room temperature for 30 minutes or warm slices in the microwave for 10-15 seconds to soften the filling slightly. The crust stays crispy even after freezing!