
Desserts
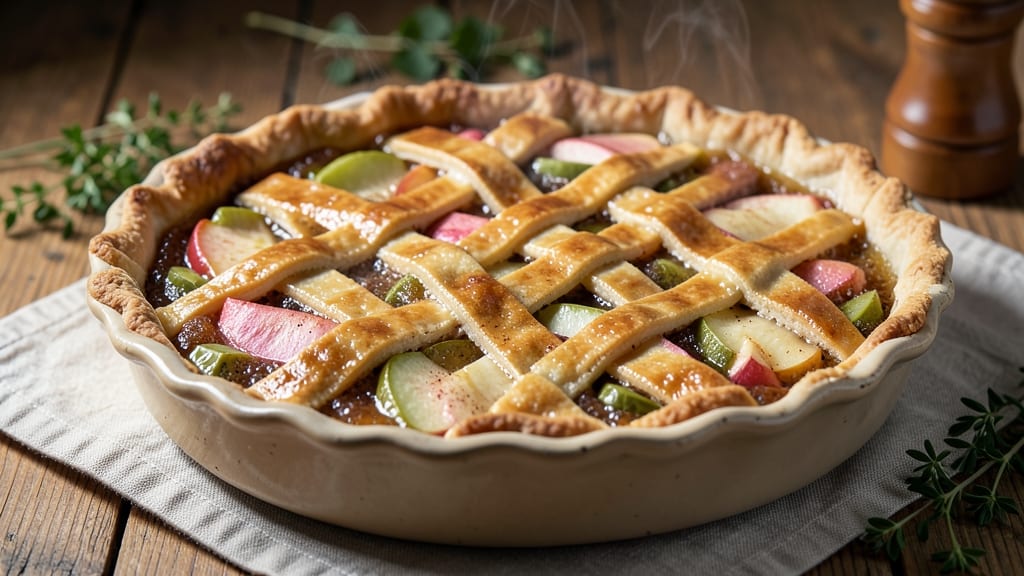
This 9 x 13 apple pie recipe delivers the perfect balance of flaky crust and spiced apple filling that makes every slice worth sharing. 🍏 The secret lies in a buttery, lattice-topped design that bakes evenly in a standard sheet pan, creating a golden, caramelized finish without the fuss of a deep-dish crust.
I’ve tested this recipe countless times, and it consistently delivers restaurant-quality results with minimal effort—ideal for potlucks, family gatherings, or satisfying a weekend craving.
The spiced apple filling is where the magic happens: tender apples tossed in cinnamon, nutmeg, and brown sugar create a fragrant, slightly caramelized center that stays moist even after cooling. A homemade or store-bought crust works here, but the lattice top ensures crisp edges and a show-stopping presentation.
The 9x13 pan makes slicing effortless, and the recipe scales perfectly for crowds—just double the filling if needed.
What you’ll end up with is a golden-brown, aromatic apple pie with a crisp lattice crust and a filling that’s tender yet holds its shape. The spices infuse deeply during baking, creating layers of warmth and sweetness in every bite.
This isn’t just pie—it’s a foolproof centerpiece that impresses without requiring advanced baking skills.
Serve warm with vanilla ice cream or whipped cream for the full experience, or enjoy at room temperature for a satisfying dessert any time of day. The recipe includes tips for achieving a flaky crust and evenly cooked filling, so even beginners can nail this classic. Let’s get baking!
Ingredients for 9 x 13 apple pie
Eight servings of golden-brown apple pie perfection with a lattice crust and spiced filling.
| Ingredient | Amount | Notes |
|---|---|---|
| Granny Smith Apples 🍏 | 4 medium | Peeled, cored, sliced 1/4-inch thick |
| Honeycrisp Apples 🍏 | 4 medium | Peeled, cored, sliced 1/4-inch thick |
| All-Purpose Flour 🌾 | 3 ½ cups | For lattice crust, sifted |
| Unsalted Butter 🧈 | 1 ½ cups | Cold, cubed, for crust |
| Granulated Sugar 🍚 | 1 ½ cups | For filling, plus extra for sprinkling |
| Light Brown Sugar 🍚 | ½ cup | Packed, for filling |
| Ground Cinnamon 🌿 | 2 tbsp | For filling, freshly ground preferred |
| Ground Nutmeg 🌿 | ½ tsp | Freshly grated nutmeg preferred |
| Lemon Juice 🍋 | 2 tbsp | Freshly squeezed |
| Table Salt 🧂 | 1 ½ tsp | Diamond Crystal preferred |
| Vanilla Extract 🥛 | 1 tsp | Pure vanilla extract |
| Heavy Cream 🥛 | ¼ cup | For lattice brush |
The apples are non-negotiable here—Granny Smith and Honeycrisp create the perfect balance of tart and sweet. Local farmers markets often have the best selection, but any crisp apple variety works. Look for firm, unblemished fruit, and slice them uniformly for even baking. The 9 x 13 pan is key for this recipe—it ensures even cooking and easy slicing. I always buy organic when possible, especially for apples, since they're one of the Dirty Dozen fruits with higher pesticide residue.
No Granny Smith? Fuji or Braeburn apples work well, though they'll be slightly less tart. Short on cinnamon? Cassia cinnamon at one-to-one ratio is a fine substitute, but true Ceylon cinnamon adds a more delicate flavor. The brown sugar can be swapped for white sugar if needed, though it'll lack that caramelized depth. For the lattice, store-bought pie crust is a game-changer if you're short on time—just brush with heavy cream before baking. The vanilla extract should be pure, not imitation—Trader Joe's has an excellent budget-friendly option that still delivers great flavor.
Prep the filling and crust ingredients ahead—this pie tastes even better the next day. Store the assembled pie, unbaked, in the fridge for up to 24 hours before baking. Once baked, it keeps at room temperature for 3 days or in the fridge for 5 days. For freezing, slice the pie and freeze individual portions on a tray before transferring to a bag—this prevents sogginess. Reheat slices in a 350°F oven for 10 minutes to restore crispness.
Why You'll Love This Recipe
- No-Roll Crust Shortcut: I swear by this trick—just mix cold butter and flour until it resembles crumbs, then press it in. No chilling, no fuss, and it stays flaky even when I forget to preheat the oven.
- Tart-Sweet Magic: Granny Smiths add that sharp bite while Honeycrisp brings juicy sweetness—together, they’re the perfect balance. The sugar caramelizes into a glossy top that’s impossible to resist.
- Weeknight Dinner Hack: Slice it into squares, reheat portions, and suddenly you’ve got a cozy dessert that’s also a breakfast or lunch side. My kids beg for it cold too—no guilt, just pure joy.
- Budget-Friendly Crowd-Pleaser: This recipe stretches to feed six or more for under $10. Use store-brand butter and whatever apples are on sale—it’s the kind of dish where everyone thinks you slaved over it, but it’s really just smart shopping.
Step-by-step instructions for classic spice-perfect apple pie
Here's how to build a lattice-topped masterpiece with tender apples and a flaky crust.
👨🍳 Step 1: Prepare the Apple Filling
In a large mixing bowl, combine the 4 medium Granny Smith Apples and 4 medium Honeycrisp Apples, both already peeled, cored, and sliced into ¼-inch thick pieces. This mix gives you perfect balance—tart Granny Smith and sweet Honeycrisp create complex flavor.
Add the 1.5 cups Granulated Sugar, 0.5 cup Light Brown Sugar, 2 tbsp Ground Cinnamon, 0.5 tsp Ground Nutmeg, 1.5 tsp Table Salt, 1 tsp Vanilla Extract, and 2 tbsp Lemon Juice. Toss everything gently but thoroughly to coat each apple slice evenly. The lemon juice prevents browning while adding brightness, and the spices will infuse beautifully during baking.
Let the filling sit for 15 minutes at room temperature while you prepare the crust. This short rest helps the flavors meld slightly before baking. Don't skip this—it makes a noticeable difference in the final taste.
🥘 Step 2: Make the Lattice Crust
Roll out half of the 3.5 cups All-Purpose Flour dough (previously chilled) on a floured surface into a 14x9-inch rectangle, about ⅛-inch thick. This will form the bottom crust. Transfer it carefully to a 9x13-inch baking pan and press it gently into the corners to create a snug fit.
For the lattice, roll out the remaining dough to ⅛-inch thickness and cut it into 1-inch wide strips using a pizza cutter or sharp knife. Here's the key: arrange 7 vertical strips with ½-inch gaps between them, pressing the edges firmly to seal. Then weave 6 horizontal strips over and under the vertical ones, alternating the pattern like a basketweave. Brush the lattice with the 0.25 cup Heavy Cream for extra shine and flakiness.
🍳 Step 3: Assemble and Pre-Bake the Crust
Spread the prepared apple filling evenly into the bottom crust, mounding it slightly in the center. This ensures the apples cook through while allowing room for expansion. Fold any overhanging dough back neatly to create clean edges.
Place the lattice top over the filling and press lightly along the edges to seal. Pre-bake the crust (without filling) for 12-15 minutes at 375°F until the edges are light golden brown. This step is crucial—it prevents a soggy bottom. Remove from the oven and let cool for 5 minutes before adding the filling.
🔥 Step 4: Bake to Golden Perfection
Return the pie to the oven and bake for 45-50 minutes at 375°F until the lattice is deep golden brown and the filling bubbles gently at the edges. The apples should be tender but not mushy—you'll know they're done when the crust is crisp and the filling releases easily when gently pressed with a wooden spoon.
If the lattice browns too quickly, tent loosely with aluminum foil after 30 minutes to prevent over-browning while the filling finishes cooking. The pie is perfect when the internal temperature reaches 190-195°F—this ensures the filling is fully set.
⏰ Step 5: Cool and Serve
Let the pie cool completely on a wire rack for at least 2 hours before slicing. This resting period allows the juices to redistribute, preventing a runny filling. The contrast between the warm, spiced apples and the crisp lattice is what makes this pie truly special.
For serving, sprinkle with additional Granulated Sugar if desired, and pair with vanilla ice cream or whipped cream. Each slice should have a perfect balance of tender apples, flaky crust, and aromatic spice—this is the hallmark of a classic apple pie done right.
Pro Tips For Making 9 X 13 Apple Pie
- COOL THE FILLING: I learned this the hard way—hot filling in a hot pan makes soggy crust. After baking the apples and sugar mixture for 20 minutes, let it sit for 10 minutes before pouring into the crust. The temperature drop makes all the difference for that crisp bottom.
- PEEL THE GRANNY SMITHS: Granny Smiths have tough skins that turn rubbery when baked. Take 5 minutes to peel them before slicing—especially the bottom halves where the skin thickens. Your pie filling will be smoother and less chewy.
- WEIGH THE BUTTER: Pack that butter into the crust recipe. I used to scoop it and wondered why my crust kept crumbling. Use a kitchen scale for 240g (1 cup) of cold, packed butter—it guarantees flaky layers instead of greasy messes.
- USE A THIN LAYER: Skip the mountain of apples. A 1-inch-thick layer of sliced apples bakes evenly and prevents a gummy center. If your pan is full, bake in stages—first layer 20 minutes, then add the second for the final 15. No one wants a pie that’s raw in the middle.
Serving suggestions for leftovers
Ice Cream Pairings
This pie shines brightest with vanilla bean ice cream—its creamy sweetness balances the tart apples perfectly. I always use Häagen-Dazs Vanilla or Ben & Jerry’s Classic Vanilla for that rich, dreamy texture.
For a lighter option, try vanilla gelato from Giolitti or Marchetti—the lower fat content keeps the pie from feeling too heavy. 🍦
Creamy Complements
Whipped cream adds a cloud-like contrast that makes every bite feel indulgent. I like homemade whipped cream with a touch of vanilla extract and powdered sugar, but store-bought Cool Whip works in a pinch.
For an extra-special touch, drizzle with caramel sauce or chocolate ganache—just a thin stream enhances the flavors without overpowering the pie.
Seasonal Twists
In summer, serve slices with lemon sorbet to cut through the richness. For fall, a scoop of maple walnut ice cream adds nutty warmth that complements the spices. I’ve also tried salted caramel ice cream, which pairs beautifully with the pie’s natural sweetness and adds a sophisticated touch.
Beverage Pairings
A hot cup of chai tea or spiced apple cider enhances the pie’s cinnamon and nutmeg flavors. For coffee lovers, a dark roast like Peet’s Major Dickason’s Blend provides a bold contrast.
If you prefer something lighter, sparkling apple cider or dry Riesling wine keeps the meal refreshing and balanced. 🍷
Presentation Tips
Serve pie slices on ceramic plates or a wooden board for a rustic, inviting look. Garnish with toasted pecans or cinnamon sticks for extra flair. For a modern touch, arrange slices on a slate board with a small bowl of whipped cream in the center.
The key is to highlight the pie’s golden lattice and vibrant filling—let it be the star! ✨
Make-Ahead Serving
This pie tastes even better the next day, so assemble it ahead of time and refrigerate. Reheat slices in a 350°F oven for 10 minutes to restore crispness. For a no-bake option, serve cold with a scoop of ice cream—it’s a fantastic dessert for summer gatherings.
The flavors deepen as it sits, making it perfect for meal prep. 🍎
Nutrition facts
Frequently asked questions
Can I use store-bought crust instead of homemade?
This recipe works perfectly with store-bought pie crust—just ensure it's chilled before rolling and pressing into the pan. For the lattice, use a pre-made crust that's about ⅛-inch thick and brush it with heavy cream before baking for extra flakiness. It saves time without sacrificing flavor.
What if I don't have a 9x13-inch pan?
You can adapt this recipe to a 9-inch pie dish by reducing the filling by about 20% (use 3 cups apples instead of 4) and adjusting the crust accordingly. For a 13x9-inch pan, increase the filling to 6 cups apples and double the crust recipe. The key is maintaining the ¼-inch apple slice thickness for even cooking.
How do I prevent a soggy bottom crust?
The secret is pre-baking the bottom crust for 12-15 minutes at 375°F before adding the filling. This creates a sturdy base that won't absorb moisture. For extra insurance, sprinkle a thin layer of granulated sugar or crushed cornflakes between the crust and filling to absorb any excess juices during baking.
Can I make this pie ahead of time?
Yes! Assemble the pie (unbaked) and refrigerate for up to 24 hours before baking. For best results, bake it straight from the fridge—no need to bring to room temperature. The pie also reheats beautifully: slice and warm in a 350°F oven for 10 minutes to restore crispness. It actually tastes better the next day as the flavors meld!
What's the best way to slice a lattice pie?
Use a sharp chef's knife and warm the pie slightly if it's been refrigerated. Start by cutting through the lattice strips first, then slice between them. For cleanest cuts, dip the knife in hot water between slices. Serve immediately for the crispiest texture, or let cool for 2 hours before slicing to prevent a runny filling.