
Desserts
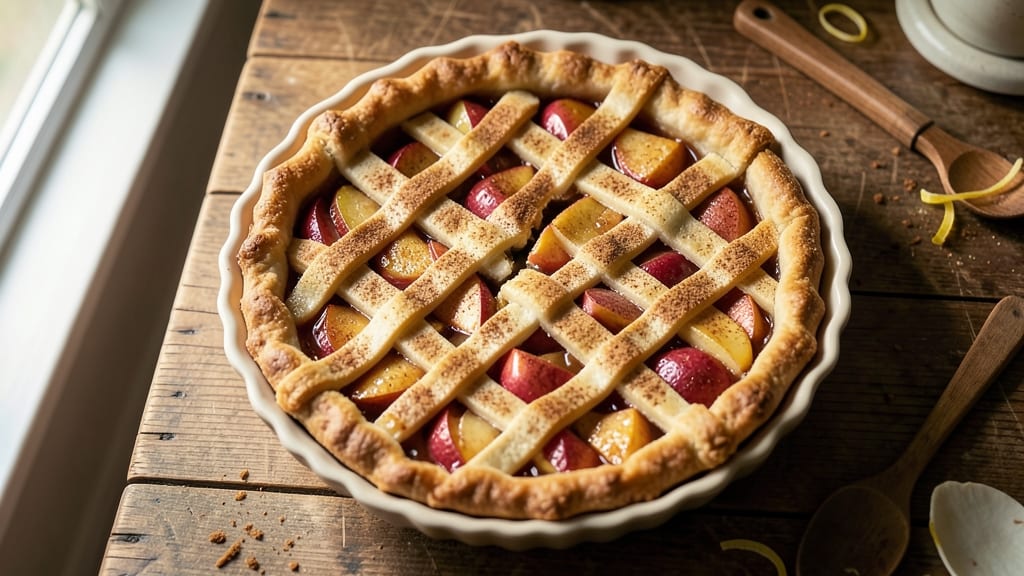
The 1950s apple pie recipe brings back that nostalgic warmth of grandma's kitchen, where homemade crust met spiced apples in perfect harmony. This classic dessert captures the essence of mid-century baking—crisp, flaky crust and a filling so fragrant it fills the house with memories.
The secret lies in a well-chilled dough and a balance of cinnamon, nutmeg, and allspice that creates layers of flavor.
What sets this recipe apart is the attention to detail that defines 1950s homestyle cooking: a lattice crust for that signature look, a buttery crust that's both sturdy and tender, and a filling that's neither too runny nor too dry.
The apples—traditionally a mix of tart and sweet varieties—cook down just enough to release their juices while maintaining texture. It's the kind of pie that tastes like comfort, made even better when shared with loved ones.
Baking time is about 50 minutes at 375°F, giving the crust a golden brown while the filling bubbles to perfection. The aroma alone will have everyone gathering in the kitchen, and the first slice reveals why this pie has stood the test of time.
Every bite delivers that perfect balance of sweet, spiced apples and buttery crust, a taste of home in every forkful.
Perfect for family gatherings, holidays, or simply treating yourself to a slice of nostalgia. This isn't just a pie—it's a piece of culinary history that brings warmth and tradition to your table. Let's get baking!
Ingredients for 1950s apple pie
These nostalgic ingredients bring back grandma's kitchen magic in every bite.
| Ingredient | Amount | Notes |
|---|---|---|
| All-Purpose Flour 🌾 | 3 cups | Sifted for flaky crust |
| Unsalted Butter 🧈 | 1 cup | Cold, cubed for crust |
| Granulated Sugar 🍚 | ¾ cup | For crust and filling |
| Ice Water 💧 | ⅓ cup | Plus 1 tbsp for dough |
| Large Egg 🥚 | 1 whole | For egg wash |
| Ground Cinnamon 🌿 | 2 tbsp | Plus 1 tsp for filling |
| Ground Nutmeg 🌿 | ½ tsp | Freshly grated preferred |
| Ground Allspice 🌶️ | ½ tsp | For authentic 1950s flavor |
| Apples 🍎 | 6 medium | Mix of tart and sweet |
| Lemon Juice 🍋 | 1 tbsp | Freshly squeezed |
| Salt 🧂 | ½ tsp | Plus extra for dough |
| Brown Sugar 🍚 | ½ cup | Packed for filling |
The apples are the heart of this pie—Granny Smith mixed with Honeycrisp gives that perfect tart-sweet balance. Local farmers markets often have the best selection, but grocery store bins work too. Look for firm, unbruised apples—they'll hold up during baking. The cinnamon and nutmeg? Penzeys or bulk bins have the freshest, most aromatic spices. If you're feeling fancy, add a pinch of cardamom for that true 1950s touch. For the dough, cold butter is non-negotiable—it's what makes that iconic flaky crust.
No Granny Smith apples? McIntosh or Braeburn work in a pinch—they're tart enough to stand up to the spices. Running low on allspice? Substitute half the amount of cinnamon plus a pinch of cloves. The brown sugar in the filling can be swapped for white sugar if that's what you've got, but the molasses notes in brown sugar really make this taste like home. For the crust, if you don't have ice water, chilled vodka works perfectly—it keeps the butter cold without the alcohol flavor. And trust me, don't skip the egg wash—it gives that golden, bakery-style finish.
This pie tastes even better the next day—3-4 days in the fridge, wrapped tightly with foil. Freeze for up to 3 months if you want to make it ahead. I always bake two pies when company's coming—one for today, one for tomorrow. The lattice crust? Worth the extra 10 minutes of cutting. And if anyone asks, the secret's in the chilling—let that dough rest for at least 30 minutes before rolling. Patience pays off with that perfect flaky layer.
Why You'll Love This Recipe
- Foolproof Dough: I swear by this cold butter method—just cut that butter into flour until it looks like crumbs, then add ice water a tablespoon at a time. No overworking, no stress, and the crust turns out flaky every single time.
- Golden Crust, Golden Memories: That buttery, sugar-kissed crust? It’s the star. The egg wash makes it shine like a diner window at dawn, and the edges get just crisp enough to hold their shape—no soggy bottoms here.
- Weeknight or Holiday: Same recipe, endless occasions. Need a quick dessert after dinner? Done. Hosting Thanksgiving? This is the backup plan. My kids even ask for it at birthday parties—because it’s that good.
- Budget-Friendly Leftovers: Apples get cheaper in season, and this pie keeps for days. Slice it up for breakfast toast, pack it in lunches, or freeze slices for lazy mornings. Less waste, more pie—win-win.
Step-by-step instructions for 1950s apple pie
Let's create a pie that tastes like grandma's—flaky, spiced, and perfectly balanced.
Make the Classic Double-Crust Dough
In a large bowl, combine the 3 cups all-purpose flour and 0.5 tsp salt. Cut in the 1 cup cold, cubed unsalted butter using a pastry cutter or your fingers until the mixture resembles coarse crumbs with pea-sized butter pieces. This ensures a flaky texture—don't overwork the dough or it'll get tough.
Gradually add the 0.33 cup ice water, 1 tablespoon at a time, mixing gently with a fork until the dough just comes together. Form into two equal disks, wrap in plastic, and chill for at least 1 hour (or up to 2 days). Chilling prevents shrinking and makes rolling easier. I like to flatten the disks slightly before wrapping so they're ready to roll immediately when I'm ready to bake.
Prepare the Spiced Apple Filling
Peel, core, and slice the 6 medium apples into ¼-inch thick slices. Toss them with the 1 tbsp lemon juice to prevent browning while you work. In a large bowl, combine the sliced apples with the 0.5 cup packed brown sugar, 0.75 cup granulated sugar, 2 tbsp ground cinnamon, 0.5 tsp ground nutmeg, and 0.5 tsp ground allspice. Mix gently—you want the spices to coat the apples evenly without crushing them.
Here's the thing—this spice blend is what makes 1950s apple pie taste so nostalgic. The nutmeg and allspice add warmth that complements the cinnamon perfectly. Taste the filling before assembling—you might want to adjust the sugar slightly based on how tart your apples are. Tart apples need more sugar, while sweet ones might need just a pinch more spice.
Assemble the Pie with Precision
Preheat your oven to 375°F. On a lightly floured surface, roll out one dough disk into a 12-inch circle, about ⅛-inch thick. Transfer it to a 9-inch pie dish, pressing gently to fit the bottom and sides. Trim any excess dough hanging over the edge. Roll out the second disk for the top crust.
Fill the bottom crust with the apple mixture, mounding it slightly in the center. Moisten the edges of the bottom crust with water, then place the top crust over it. Trim any excess dough from the top, leaving about ½-inch overhang. Brush the top crust with the 1 whole large egg beaten with a splash of water for the classic egg wash. This creates that beautiful golden crust we all love.
Create the Signature Lattice Top
Here's where it gets fun—cut the overhanging top crust into ½-inch wide strips. Arrange 6 strips vertically across the pie, spacing them evenly. Then, cut the remaining dough into ½-inch wide strips and weave them horizontally between the vertical strips, alternating ends to create a lattice pattern. This design allows steam to escape while keeping the filling moist.
Press the edges together to seal completely, then crimp with a fork or your fingers. Cut a few small slits in the top to allow steam to vent. Bake for 50-60 minutes until the crust is deep golden brown and the filling is bubbling through the slits. The pie is done when the crust sounds hollow when tapped and the filling is tender.
Rest and Serve for Perfect Texture
Remove the pie from the oven and let it cool on a wire rack for at least 2 hours before slicing. This resting period allows the filling to set properly and prevents a soggy crust. The pie will look less impressive right out of the oven, but trust me—waiting makes all the difference in texture.
Slice into 8 equal wedges and serve warm with a scoop of vanilla ice cream. The combination of the flaky crust, spiced filling, and cool ice cream is what makes this pie taste like a true 1950s homemade classic. Store any leftovers in the refrigerator for up to 3 days or freeze for up to 3 months—it reheats beautifully!
Pro Tips For Making 1950s Apple Pie
- CHILL THE BUTTER FIRST: Cold butter makes flaky crusts—no exceptions. Cut that unsalted butter into tiny pea-sized pieces and toss them in the flour before adding ice water. I learned this the hard way after making a greasy, dense mess from overworked dough. Trust me, your crust will thank you.
- USE ICE WATER SPARINGLY: Too much water turns your dough into glue. Start with just 4 tablespoons of ice water, then add more one teaspoon at a time until it barely holds together. The dough should clump when pressed, not stick to your fingers like a sad, wet snowball.
- DON’T SKIP THE EGGSHELL: That egg isn’t just for binding—it’s the glue that keeps your crust from cracking during baking. Crack it into a separate bowl first to avoid shell bits, then whisk it into the flour-butter mix before adding water. I’ve seen too many pies with egg-speckled crusts to ignore this.
- BAKE LOW AND SLOW: 1950s pies weren’t rushed. Preheat your oven to 375°F (not 425°F—this isn’t a shortcut) and bake the pie on the lower third rack. If the edges brown too fast, tent it with foil. I used to overbake mine, and the filling turned to mush. Patience wins every time.
Storing and reheating this recipe
Refrigerator Storage
Your freshly baked 1950s-style apple pie stays delicious in the refrigerator for up to 3 days when stored properly. Let it cool completely first, then wrap tightly with plastic wrap followed by a layer of aluminum foil to prevent drying.
The foil creates a seal that locks in moisture and keeps the crust crisp. I like to place the pie on a wire rack in the fridge to prevent sogginess from condensation. 🍎
Freezer Preservation
For long-term storage, freeze your pie for up to 3 months without sacrificing quality. Wrap it completely in heavy-duty plastic wrap, then place it in a freezer bag with all air removed. I recommend using a vacuum sealer if you have one—it preserves texture better than traditional wrapping.
Label with the date and store flat to save space. The filling stays perfectly spiced and the crust maintains its flakiness when thawed properly. ❄️
Thawing Techniques
Thaw overnight in the refrigerator for the best results—this gradual approach prevents condensation that can make the crust soggy.
If you're short on time, place the wrapped pie in a cold water bath (change water every 30 minutes) for 1-2 hours, then let it sit at room temperature for 30 minutes before reheating. Never microwave from frozen—this ruins the texture completely.
Reheating Perfection
For the best texture, reheat your pie in a 350°F oven for 20-25 minutes covered with foil, then uncover for the last 5 minutes to crisp the crust. This method restores the golden color and maintains that perfect flaky layer.
If you prefer stovetop, place slices in a skillet over medium-low heat for 3-4 minutes per side with a splash of water to steam the filling. 🔥
Microwave Shortcut
When you're really in a hurry, use the microwave on 50% power for 1-2 minutes per slice, covered with a damp paper towel. This prevents drying while warming through.
For best results, microwave only until the filling is hot (about 1 minute for one slice), then finish with 30 seconds in the oven under the broiler to crisp the crust.
Serving Leftovers
Leftovers taste just as good as fresh—if not better! The flavors actually deepen overnight as the spices meld. Serve warm slices with a scoop of vanilla bean ice cream or a dollop of whipped cream.
For a true 1950s touch, dust with a pinch of cinnamon before serving. I always save at least one slice for breakfast the next morning—trust me, it's a game-changer. 💫
Nutrition facts
Frequently asked questions
Can I make this pie without a food processor for the dough?
The 1950s recipe was made by hand, and you can too. Use a pastry cutter or your fingertips to cut the cold butter into the flour until you get pea-sized pieces. The key is to work quickly and keep everything cold—this creates that perfect flaky texture without needing a food processor.
What's the best way to prevent a soggy bottom crust?
Prevent soggy crusts by pre-baking the bottom crust for 5-7 minutes at 375°F before adding the filling. This creates a barrier that won't absorb the apple juices. Another trick? Sprinkle a thin layer of cornstarch or crushed graham crackers on the bottom crust before adding the filling—this absorbs excess moisture beautifully.
Can I substitute apples if I can't find Granny Smith?
Yes! For a similar tart-sweet balance, use McIntosh or Braeburn apples. If your apples are particularly sweet, add ½ tsp extra cinnamon to the filling. The 1950s recipe was flexible—just adjust based on what's available. A mix of two varieties (like Honeycrisp and Fuji) works wonderfully too.
Why does my lattice crust keep falling apart?
Lattice tops need a sturdy base! Make sure your top crust is chilled before cutting strips, and keep the strips about ½-inch wide for stability. Press the edges firmly together and crimp well. If it's still weak, try using a little extra dough for the lattice—more structure means less collapsing. Patience is key here!
How do I make this pie gluten-free?
For a gluten-free version, replace the all-purpose flour with a 1:1 gluten-free flour blend (like Bob's Red Mill) plus ½ tsp xanthan gum. Use 1 extra tablespoon of cold water in the dough. The crust will be slightly different but still delicious. For the filling, everything remains the same—just ensure your apples are peeled to avoid any texture issues.