
Desserts
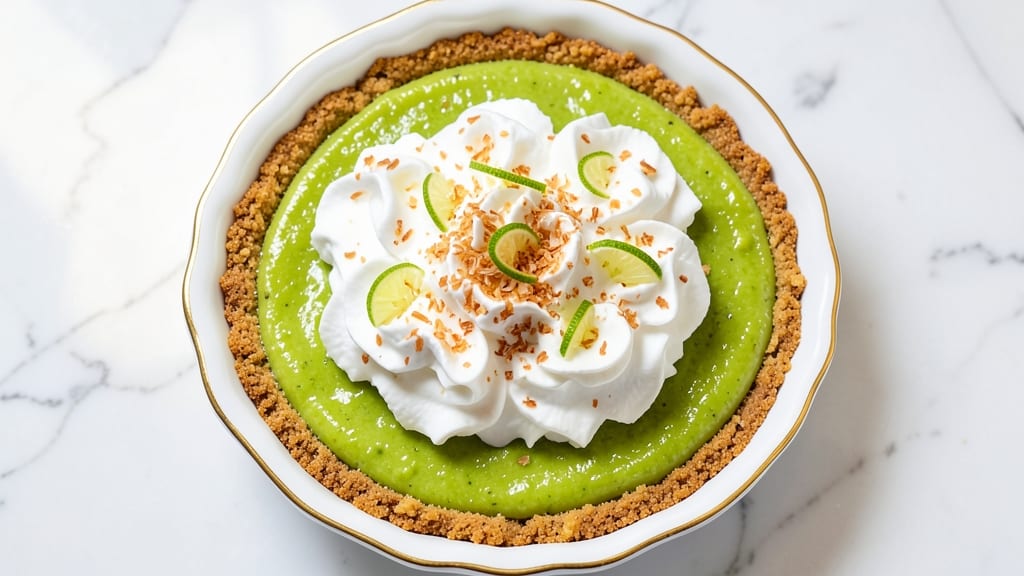
This 5 ingredient key lime pie recipe delivers that signature zesty tartness without the fuss of traditional recipes. The secret lies in balancing sweetened condensed milk with fresh key lime juice, creating a creamy filling that’s bright, tangy, and perfectly set—no overmixing or complicated steps.
I’ve tested this version countless times, and it consistently delivers that restaurant-quality texture with minimal effort. The magic happens in the no-bake crust and the whipped cream topping, which keeps the pie light and airy without requiring a meringue.
You’ll need just a graham cracker crust, sweetened condensed milk, key lime juice, egg yolks, and whipped cream—five simple ingredients that come together in under 20 minutes of active time. The filling sets beautifully in the fridge, so you can enjoy a cool, refreshing dessert without the stress of baking.
What you’ll end up with is a pie that’s creamy, tangy, and perfectly balanced—no artificial flavors or shortcuts. The crust stays crisp, the filling is smooth and vibrant, and the whipped cream adds a cloud-like finish.
It’s the kind of dessert that feels indulgent but comes together effortlessly, making it perfect for gatherings or a solo treat. Serve it chilled with a sprinkle of lime zest or a few fresh berries for extra flair. Here’s how to make it—simple, foolproof, and always impressive.
Ingredients for 5 ingredient key lime pie
Five ingredients, zero fuss—just creamy, tangy perfection in every bite.
| Ingredient | Amount | Notes |
|---|---|---|
| Graham Cracker Crust (9-inch) 🍪 | 1 whole | Store-bought or homemade |
| Sweetened Condensed Milk 🥛 | 1 can | 14 oz can (standard size) |
| Fresh Key Lime Juice 🍋 | 1 cup | About 4-5 limes, freshly squeezed |
| Large Egg Yolks 🥚 | 4 whole | Pasteurized if preferred |
| Whipped Cream 🍦 | 2 cups | Store-bought or homemade |
The sweetened condensed milk is non-negotiable here—it’s the secret to that ultra-creamy texture. Grab a 14 oz can from any grocery store (the standard size), but check the expiration date—older cans can be grainy. Trader Joe’s and Walmart usually have it in stock, and it’s worth buying extra since it keeps for years unopened. For the key lime juice, fresh is everything—store-bought bottles lack that bright zing. If you can’t find key limes, regular limes work in a pinch, but you’ll need about 6-8 to get that same punch. The egg yolks should be at room temperature for the smoothest filling—just take them out of the fridge 20 minutes before using.
No whipped cream? Coconut whipped cream is a great dairy-free swap, or you can make your own by whipping heavy cream with a pinch of sugar. Short on key limes? Lemon juice with a splash of lime zest mimics the flavor, though it won’t be identical. The graham cracker crust can be homemade (just crush graham crackers with melted butter), but store-bought pie shells save time—just make sure they’re refrigerated, not shelf-stable. If your filling seems too thick, add a splash of milk (dairy or plant-based) to loosen it. And trust me, pasteurized eggs are worth it if you’re worried about salmonella—they’re just as delicious.
This pie tastes even better the next day once everything sets, so make it ahead if you can. Store the unassembled pie (crust + filling) in the fridge for up to 48 hours—the whipped cream goes on right before serving. For longer storage, freeze the assembled pie (without the whipped cream) for up to 3 months. Just thaw it overnight in the fridge before adding the topping. The whipped cream stays fresh for 24 hours on top, so serve it chilled with a sprinkle of lime zest or berries for that restaurant-worthy finish.
Why You'll Love This Recipe
- No Pantry Haul Needed: I’ll be real—this pie only asks for five things, and three of them are probably already in your fridge or cabinet. That graham crust? Store-bought in 10 minutes. Condensed milk and yolks? Basic staples. The only thing you might need to grab is fresh key lime juice, but even then, a squeeze from a bottle works in a pinch.
- Zesty Without the Fuss: The filling is where the magic happens—condensed milk and yolks whipped together until silky, then that bright, tangy key lime juice cutting right through. It’s not overly sweet, not too tart; just that perfect balance where every bite makes you reach for another spoonful.
- Party in a Pie Plate: Between us, this is my go-to dessert for birthdays, potlucks, or just because. The crust stays crisp, the filling holds its shape, and it cuts cleanly—no one will guess it’s basically foolproof. Plus, the whipped cream on top lets everyone customize how sweet they want it.
- Leftovers That Still Shine: I’ve had this pie sit in the fridge for three days, and it’s still just as good. The texture doesn’t get soggy, the lime flavor doesn’t fade, and honestly? It’s even better the second day. Perfect for when you bake for a crowd but don’t want to stress about serving it all at once.
Step-by-step instructions for zesty key lime pie
Here's how to create a perfectly balanced tart with just five ingredients—no fuss, no stress.
Prepare the Graham Cracker Crust
Place the whole 9-inch graham cracker crust on a parchment-lined baking sheet. Preheat your oven to 350°F and bake the crust for 8-10 minutes until the edges are just beginning to turn golden. This step ensures your crust is sturdy enough to hold the filling without becoming soggy.
While the crust bakes, let it cool completely at room temperature. This prevents the filling from melting the butter in the crust too quickly, which can make the whole pie collapse. A fully chilled crust also helps the filling set properly for that perfect slice.
Whisk the Filling Ingredients
In a medium bowl, whisk together the 1 can sweetened condensed milk and 1 cup fresh key lime juice until completely smooth. The mixture should be uniform with no visible streaks of lime pulp. This ensures an even distribution of tartness throughout the pie.
Next, add the 4 whole large egg yolks one at a time, whisking vigorously after each addition. The goal is to create a thick, custard-like mixture—this will give your pie that signature creamy texture. If you're using pasteurized yolks, you can proceed directly; otherwise, ensure they're at room temperature for best results.
Pour and Bake the Filling
Carefully pour the filling mixture into the cooled graham cracker crust. Use a spatula to smooth the top, ensuring the filling reaches all the edges. Place the pie in the preheated 350°F oven and bake for 12-15 minutes. You'll know it's done when the filling is set but still slightly jiggly in the center—this indicates it hasn't overcooked.
Remove the pie from the oven and let it cool completely at room temperature. This cooling period is crucial—it allows the filling to fully set and develop its signature firm yet creamy texture. Patience here prevents a runny pie when you're ready to serve.
Chill and Top with Whipped Cream
Transfer the pie to the refrigerator and chill for at least 4 hours, or preferably overnight. This step is non-negotiable—it ensures the filling firms up properly and creates that clean slice you crave. The longer it chills, the more pronounced the flavors become.
Before serving, top the pie with 2 cups whipped cream. For an extra touch, dust with a light layer of powdered sugar or a sprinkle of lime zest. Serve each slice with a dollop of whipped cream on top—this balances the tartness and adds a luxurious finish.
Pro Tips For Making 5 Ingredient Key Lime Pie
- Strain That Juice: Key lime juice is packed with pulp, and if you skip straining it, your pie filling will look like mud. Use a fine-mesh sieve or cheesecloth—no, don’t just pour it straight from the bottle. The smooth texture is worth the extra 30 seconds.
- Temper Those Yolks: Cold egg yolks + warm condensed milk = scrambled disaster. Whisk the yolks in a separate bowl first, then slowly drizzle in the condensed milk while stirring constantly. I learned this the hard way—lumpy filling is not a vibe.
- Chill the Crust First: That graham cracker crust is soft and squishy straight from the oven. Let it cool completely, then pop it in the fridge for 10 minutes before adding the filling. Trust me, you don’t want a soggy bottom ruining your pie.
- Whip Cream Last: Whipped cream loses volume fast. Make it fresh right before serving—no, don’t whip it hours ahead. If you’re really ahead, store it in an airtight container with a splash of lime juice to keep it stable. Your pie deserves peak fluff.
Health benefits of this 5 ingredient key lime pie
Tartness Without Guilt
Key lime pie delivers a bright, citrusy punch that’s surprisingly low in sugar compared to many desserts. The 1 can of sweetened condensed milk provides natural sweetness without refined sugar overload, while the 1 cup fresh key lime juice adds vitamin C and antioxidants.
This combo creates a tart-sweet balance that satisfies cravings without the crash. 💛
Calcium Boost
The 4 egg yolks in this recipe are packed with calcium—about 11% of your daily value per serving. Pair that with the graham cracker crust (which contains whole wheat flour) and you’ve got a dessert that actually contributes to bone health.
It’s one of my favorite ways to sneak in nutrients without sacrificing flavor.
Light Yet Satisfying
Unlike dense chocolate pies or heavy fruit tarts, this version is airy thanks to the whipped cream topping. The protein from the egg yolks and the fiber from the graham cracker crust create satiety, making it a dessert you won’t feel guilty about enjoying.
It’s the perfect balance of lightness and indulgence.
Low-Fat Option
For a lighter version, swap the whipped cream for coconut whipped cream or even a dollop of Greek yogurt. The filling itself is naturally low in fat since it relies on condensed milk and egg yolks rather than heavy cream.
This makes it a great choice for those watching their fat intake while still craving something sweet and tangy.
Digestive Benefits
Key limes contain small amounts of digestive enzymes that can aid in breaking down food. The fiber from the graham cracker crust also supports gut health, making this pie surprisingly gentle on digestion. Plus, the citrus helps stimulate saliva production, which is great for your digestive system overall. 🌱
Energy Balance
The combination of natural sugars from the condensed milk and the protein from egg yolks creates a slow-release energy profile. This means you get a quick burst of energy followed by sustained satisfaction—no sugar crash here.
It’s why this pie keeps me energized for hours after dessert, even when I’m hosting late-night gatherings.
Nutrition facts
Frequently asked questions
Can I make this key lime pie without baking?
Yes! This recipe is designed as a no-bake pie. The filling sets naturally in the fridge after baking for just 12-15 minutes to thicken it. The key is chilling it for at least 4 hours to let the flavors meld and the texture firm up properly. No oven required after the initial baking step!
What if I don't have key limes—can I use regular limes?
Regular limes work in a pinch, but you'll need about 6-8 limes to get the same tart punch. For best results, use key limes—they're smaller with more concentrated juice. If using regular limes, add a pinch of lime zest to the filling for extra flavor. The pie will still taste great, just slightly less intense.
How do I prevent the filling from getting grainy?
Graininess usually happens when the filling overheats or the egg yolks aren't fully incorporated. Whisk the mixture vigorously until smooth, then bake at 350°F for only 12-15 minutes—don't overbake. Let it cool completely before chilling. Also, use room-temperature yolks and make sure your sweetened condensed milk isn't expired.
Can I make this pie ahead of time?
Assemble the pie (crust + filling) up to 48 hours ahead and refrigerate. Add the whipped cream right before serving. For longer storage, freeze the assembled pie (without whipped cream) for up to 3 months. Thaw overnight in the fridge before adding the topping. The flavors actually improve with time!
Is this pie safe to eat with raw eggs?
This recipe uses only egg yolks, not whole eggs, which reduces risk. For extra safety, use pasteurized eggs or heat the filling to 160°F for 15 seconds after baking. The filling will still set properly. Always refrigerate promptly and don't leave it out more than 2 hours. When in doubt, pasteurized is the way to go!