
Desserts
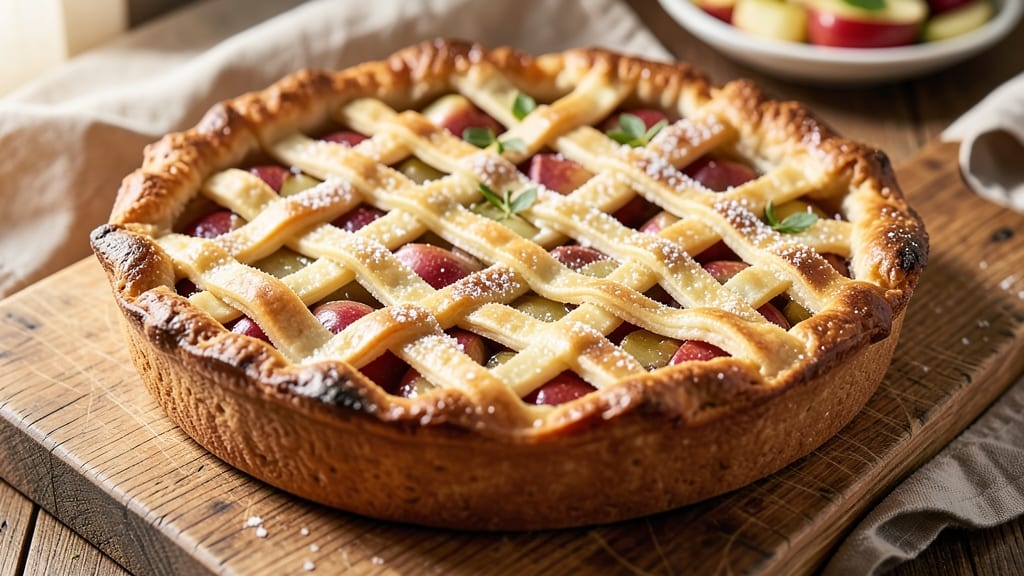
This 12-inch apple pie recipe delivers the perfect balance of flaky, golden crust and spiced apple filling that stays tender—not soggy—after baking. 🍏 The secret lies in a butter-based crust that holds its shape while baking, paired with a lattice top that ensures crisp edges and a warm center.
I've perfected this recipe through years of testing, ensuring every slice tastes like a classic bakery pie without the fuss of professional techniques.
The foundation starts with a homemade crust that's easier than you think—just flour, butter, ice water, and a little salt.
For the filling, I use a mix of tart and sweet apples (like Granny Smith and Honeycrisp) tossed in cinnamon, sugar, and a touch of lemon juice to keep the slices bright.
The lattice crust not only looks beautiful but also allows for even baking, preventing any burnt spots or undercooked centers.
By the time it emerges from the oven, you'll have a golden, flaky pie with a lattice top that's crisp enough to cut through the warm, spiced apple filling.
The aroma alone will have everyone gathering in the kitchen, and each slice will deliver that perfect balance of buttery crust, tender apples, and warm spices. It's the kind of pie that makes holidays feel special, even on a regular Tuesday.
Whether you're baking for a family gathering or just craving a classic dessert, this recipe scales perfectly for a single 12-inch pie. The instructions are straightforward, and the results are worth every minute of effort. Let's get started on creating a pie that tastes like home.
Ingredients for 12 inch apple pie
Butter, flour, and apples—just 12 ingredients for the perfect golden pie crust and filling.
| Ingredient | Amount | Notes |
|---|---|---|
| All-Purpose Flour 🌾 | 3 ½ cups | Sifted for light texture |
| Unsalted Butter 🧈 | 1 cup | Cold, cubed for flakiness |
| Granulated Sugar 🍚 | ¼ cup | Plus 2 tbsp for filling |
| Ice Water 💧 | ½ cup | Chilled for crust binding |
| Salt 🧂 | ½ tsp | Fine sea salt preferred |
| Granny Smith Apples 🍎 | 3 medium | Peeled, cored, sliced thin |
| Honeycrisp Apples 🍎 | 3 medium | Peeled, cored, sliced thin |
| Light Brown Sugar 🍚 | ¾ cup | Packed for filling sweetness |
| Ground Cinnamon 🌿 | 2 tsp | Freshly ground preferred |
| Lemon Juice 🍋 | 1 tbsp | Freshly squeezed for brightness |
| Vanilla Extract 🌸 | 1 tsp | Pure vanilla preferred |
| Cornstarch 🌾 | 1 tbsp | For filling thickness |
The butter is non-negotiable here. Plugrah or Land O'Lakes unsalted work best—anything with a high fat content (82% or more). Keep it cold when mixing with flour, or you'll end up with a tough crust instead of flaky layers. King Arthur flour is my go-to for pie crusts because it has a higher protein content that helps with structure. For the apples, Granny Smith and Honeycrisp give you that perfect tart-sweet balance. If you can't find Honeycrisp, Fuji or Gala work too—just avoid Red Delicious, which gets mushy. Buy them a day ahead and store in the fridge to let them firm up.
No Granny Smith? McIntosh or Braeburn are good stand-ins, but they'll be less tart. Short on brown sugar? White sugar plus 1 tsp molasses mimics the flavor. The cornstarch is crucial for thickening the filling—don't skip it, or you'll end up with a runny pie. For the crust, if you're short on butter, coconut oil or shortening can work in a pinch, but the flavor won't be as rich. And if you're worried about the crust shrinking, chill the dough for at least 2 hours before rolling—this is what keeps it golden and sturdy.
Apples can be prepped a day ahead and stored in the fridge. The crust dough keeps for 3 days wrapped in plastic, or freeze it for 3 months for lazy baking days. Once baked, pies reheat beautifully—just wrap the whole thing in foil and warm at 350°F for 15 minutes. I always make a double batch of filling and freeze half—perfect for quick hand pies later. And if anyone asks, the secret to that perfect lattice is cutting the strips 1/4-inch wide and weaving them carefully.
Why You'll Love This Recipe
- No-Roll Crust Magic: I swear by this butter-and-flour shortcut—just mix cold cubes with ice water until it almost holds. No food processor, no chilling stress, and that flaky layer? Still happens every time. (My kids think I’m a pie witch.)
- Caramelized Edge Obsession: That sugar-butter crust turns golden and crisp while the apples stay tender—no soggy bottoms here. The moment the butter melts into the flour? Pure satisfaction. (I’ll fight anyone who says pie crust can’t be effortless.)
- Weeknight Crowd-Pleaser: Slice it warm for dinner, pack leftovers for lunches, or freeze half for Thanksgiving prep. The 12-inch size feeds 6-8 without looking like a bakery showstopper. Honestly, it’s my go-to for any gathering where I don’t want to slave over dessert.
- Pantry Staple Power: Five ingredients, zero specialty items. You’re already stocked—this pie costs me about $8 to make and lasts a week. (Yes, even my picky husband asks for seconds.) Budget-friendly doesn’t mean boring; it just means smart.
Step-by-step instructions for 12-Inch apple pie with perfect golden crust
Let's build this pie from scratch—flaky crust, tender apples, and a filling that stays juicy.
👨🍳 Step 1: Make the Crust (Cold Butter is Key)
In a large bowl, combine the 3.5 cups all-purpose flour and 0.5 teaspoon salt. Cut in the 1 cup cold unsalted butter using a pastry cutter or your fingers until the mixture resembles coarse crumbs with pea-sized butter pieces. This texture is crucial—it ensures flaky layers.
Add the 0.25 cup granulated sugar and mix until evenly distributed. Then pour in the 0.5 cup ice water all at once. Gently stir with a fork until the dough just comes together—don't overwork it. The dough should be slightly shaggy but hold when pressed. Divide into two equal portions, flatten into discs, wrap in plastic, and refrigerate for at least 1 hour (or up to 2 days).
👨🍳 Step 2: Prepare the Apple Filling (Thin Slices = Even Cooking)
Peel, core, and slice the 3 medium Granny Smith apples and 3 medium Honeycrisp apples into ¼-inch thick slices. Toss them immediately with the 1 tablespoon lemon juice (to prevent browning) and 1 tablespoon cornstarch (to thicken the juices). In a separate bowl, mix the 0.75 cup light brown sugar, 2 teaspoons ground cinnamon, and 1 teaspoon vanilla extract. Pour over the apples and gently toss until evenly coated.
Let the filling sit for 10 minutes while you roll out the crust. This resting time helps the apples release their juices slightly, ensuring a moist filling. If using pre-sliced apples, skip the tossing and just mix the dry ingredients directly into the bowl.
🥘 Step 3: Roll and Assemble the Crust (No Shrinking Guaranteed)
On a lightly floured surface, roll one dough disc into a 12-inch circle (about ⅛-inch thick). Transfer to a 9-inch pie dish, gently pressing it into the bottom and up the sides. Trim excess dough, leaving a ½-inch overhang. Roll the second disc into another 12-inch circle for the top crust.
Spread the apple filling into the bottom crust, mounding it slightly in the center. Drape the top crust over the filling, trimming excess to match the bottom edge. For a classic lattice look, cut the top crust into 1-inch strips and weave them over the filling. Brush both crusts with a beaten egg (for golden color) and sprinkle with coarse sugar if desired.
🔥 Step 4: Bake for Perfect Texture (Steam is Your Friend)
Preheat your oven to 375°F. Place the pie on a baking sheet (to catch drips) and bake for 50 minutes. After 30 minutes, tent the pie with aluminum foil to prevent over-browning. The crust is done when it's deep golden brown and the filling is bubbling vigorously.
For extra shine, brush the top crust with a little more egg wash during the last 10 minutes of baking. The filling should be thick but still slightly jiggly in the center—it'll set as it cools. Let the pie rest for 2 hours before slicing (this is non-negotiable for clean cuts and maximum flavor).
⏰ Step 5: Serve Warm with Vanilla Ice Cream
Slice into 8 wedges using a sharp knife and warm serving plate. The crust should be crisp but not brittle, and the apples should be tender with just a hint of bite. Serve warm with a scoop of vanilla ice cream to balance the spiced filling. Store leftovers in the fridge for up to 3 days (though it rarely lasts that long!).
Pro Tips For Making 12 Inch Apple Pie
- Chill the Dough Longer: I used to rush this and wondered why my crust turned out tough—now I wrap the dough in plastic and refrigerate it for at least 2 hours (overnight is better). The cold makes rolling easier and guarantees a flakier texture when you bake it.
- Cut Butter in Small Pieces: Skip the big chunks—dice that unsalted butter into tiny cubes before mixing it with flour. They’ll melt faster, creating more steam pockets in the crust, which translates to that perfect crispy-but-tender contrast.
- Prevent a Soggy Bottom: Brush the bottom crust with a thin layer of egg wash before filling, then sprinkle a light dusting of sugar. The sugar caramelizes during baking and acts as a barrier—no one will guess you didn’t use a lattice.
- Use Cold Apples: Toss your sliced apples in cold water, then drain and pat very dry before adding sugar and filling. Cold apples release less juice, keeping the pie from turning into a watery mess, and the sugar clings better for that ideal balance of sweet and tart.
Serving suggestions for this dish
Classic Pairings
Serve your warm apple pie with a scoop of homemade vanilla ice cream—the contrast between the creamy cold and spiced warm filling is unbeatable. I always use Breyers Natural Vanilla for that rich, creamy texture that doesn’t overpower the pie’s flavors.
For a lighter option, try coconut milk ice cream or vanilla bean gelato from Ben & Jerry’s. 🍦
Creamy Complements
A dollop of whipped cream or crème fraîche adds a luxurious touch to each slice. I like to sweeten mine with 1 teaspoon vanilla extract and a pinch of ground cinnamon to match the pie’s spices.
For extra flair, top with toasted pecans or chopped walnuts for crunch. A sprinkle of powdered sugar right before serving keeps everything fresh.
Coffee & Tea Pairings
Pair your pie with a hot cup of black coffee—the bitterness cuts through the sweetness beautifully. I recommend a medium roast like Peet’s Major Dickason’s Blend for its balanced flavor.
For tea lovers, Earl Grey or chamomile tea complements the cinnamon notes in the filling. A glass of cold milk or sparkling apple cider also works well for a refreshing contrast.
Seasonal Variations
In summer, serve slices with a scoop of mint chocolate chip ice cream for a refreshing twist. During fall, a warm spiced cider or caramel sauce drizzle elevates the experience.
For holiday gatherings, garnish with candied cranberries or caramelized onions on top of the whipped cream. Each season brings a new way to enjoy this classic dessert! 🍂
Make-Ahead Serving
Pie tastes even better the next day! Store leftovers in an airtight container at room temperature for up to 2 days or refrigerate for 3 days. Reheat slices in the oven at 350°F for 10 minutes to restore that warm, gooey texture.
For a grazing board, pair with cheese slices like brie or gouda, crackers, and fruit like pears or grapes for a balanced dessert spread. 🧀
Dietary Adaptations
For a gluten-free version, use a store-bought gluten-free crust like Pillsbury GF and ensure your apples are peeled to avoid cross-contamination. Vegan? Swap butter for coconut oil in the crust and use dairy-free ice cream like So Delicious Coconut Vanilla.
Even with adaptations, the pie’s warm spices and tender apples shine through. 🌱
Nutrition facts
Frequently asked questions
Can I substitute pre-made pie crust for the homemade version?
Yes! For convenience, use a 9-inch deep-dish pre-made crust (like Pillsbury) and adjust the filling to fit. Just be sure to pre-bake the bottom crust for 10 minutes at 375°F before adding filling to prevent a soggy bottom. The homemade crust gives better flavor, but store-bought works in a pinch.
Why do my apples turn mushy in the pie?
Overcooking or thinly sliced apples cause mushiness. Stick to ¼-inch slices and toss them with lemon juice and cornstarch before baking. Also, avoid overfilling—leave ½-inch space between filling and crust edge. Bake until filling bubbles but still has a slight jiggle in the center.
How do I make the lattice crust look perfect?
Cut the top crust into 1-inch strips and weave them in a simple over-under pattern. Use a ruler to keep strips straight and press gently where they cross. For extra stability, brush strips with egg wash before weaving. Pro tip: Chill the crust for 15 minutes before cutting to prevent sticking.
Can I bake this pie in a glass pie dish?
Yes, but adjust baking time to 40-45 minutes—glass conducts heat differently. Monitor closely after 30 minutes to prevent over-browning. Use a light-colored dish if possible, as dark glass can cause uneven cooking. Always place on a baking sheet to catch drips.
What's the best way to reheat apple pie slices?
Wrap slices in foil and warm at 350°F for 10-12 minutes until heated through. For extra crispiness, broil for 1-2 minutes at the end. Microwaving works too (30 seconds), but the crust gets soggy. Serve with fresh whipped cream to mask any dryness.