
Desserts
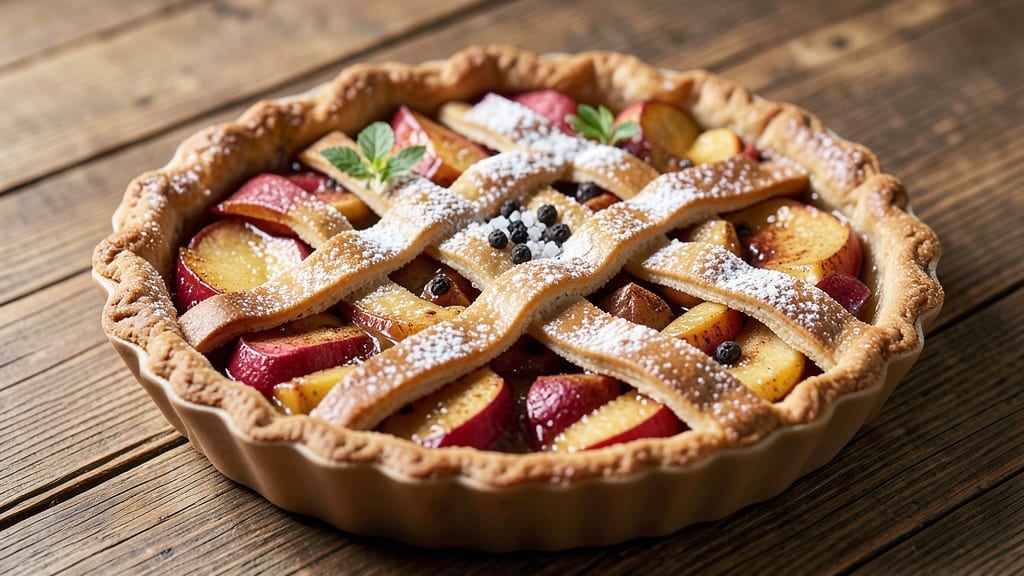
This Starbucks apple pie recipe delivers the same warm, cinnamon-spiced perfection you crave—just with a homemade twist. 🌟 The secret lies in a buttery lattice crust and a filling so flavorful, it tastes like your favorite coffee shop treat.
I've perfected the balance of tender apples, warm spices, and that signature caramelized crust that makes every slice irresistible.
What sets this recipe apart is the professional technique: a double-crust design with a lattice pattern for crispy edges and flaky layers, plus a filling that's thickened just enough to hold its shape while staying juicy.
The cinnamon-sugar topping adds that extra crunch and sweetness that Starbucks fans love, while a simple egg wash ensures a golden, bakery-style finish.
By the time it emerges from the oven, you'll have a pie with a tender, spiced apple filling that's perfectly balanced between sweet and tart, encased in a lattice crust that's crispy yet tender.
The aroma alone will have everyone gathering around the table, and each slice delivers that comforting, familiar taste of a Starbucks apple pie—just made with love at home.
Whether you're baking for a holiday gathering or simply craving a cozy dessert, this recipe delivers restaurant-quality results with simple techniques. The best part? It's easier than you think, and the payoff is a pie that tastes like a warm hug in every bite.
Ingredients for starbucks apple pie
Eight crisp apples and a lattice crust that'll make your kitchen smell like Starbucks.
| Ingredient | Amount | Notes |
|---|---|---|
| All-Purpose Flour 🌾 | 4 cups | Sifted for flaky crust |
| Unsalted Butter 🧈 | 1 cup | Cold, cubed for lattice |
| Granulated Sugar 🍚 | 1 ½ cups | White or brown for depth |
| Light Brown Sugar 🍚 | ½ cup | Packed for caramelized flavor |
| Ground Cinnamon 🌿 | 2 tbsp | Freshly ground preferred |
| Salt 🧂 | 1 tsp | Fine sea salt preferred |
| Large Eggs 🥚 | 1 whole | Room temperature for wash |
| Apples 🍎 | 8 medium | Honeycrisp or Granny Smith |
| Lemon Juice 🍋 | 2 tbsp | Freshly squeezed for tartness |
| Cornstarch 🌾 | 2 tbsp | For thickened filling |
| Vanilla Extract 🌸 | 1 tsp | Pure for depth of flavor |
| Ground Nutmeg 🌿 | ½ tsp | Freshly grated preferred |
| Heavy Cream 🥛 | ¼ cup | For egg wash richness |
The apples are everything—Honeycrisp or Granny Smith (or a mix) hold up best to baking. Trader Joe's usually has Honeycrisp in season, but any firm, crisp apple works. Peel and slice them 1/4-inch thick—thinner slices get mushy. Toss with lemon juice right away to keep them from browning. For the crust, butter matters: grab European-style if you can, but regular unsalted works too. Keep it cold when you cut it into strips for that lattice—don't let it warm up, or you'll lose the flakiness. Pre-sift your flour to avoid tough crusts, and don't overwork the dough. The secret's in the tender handling.
No cornstarch? All-purpose flour at double the amount works in a pinch, but your filling might be a tad thicker. Running short on apples? Pear slices add a nice twist—just reduce lemon juice to 1 tbsp. Want extra crunch on top? Sprinkle turbinado sugar over the lattice strips before baking. The cinnamon-sugar topping in the intro? Mix 1/4 cup sugar + 1 tbsp cinnamon and sprinkle over the filling before adding the top crust. For a deeper flavor, swap 1 tbsp of water in the filling for apple cider or bourbon—trust me, it elevates everything.
This pie keeps 3 days in the fridge, but honestly? It's best the day it's made. For leftovers, slice and reheat at 350°F for 10 minutes—just cover with foil to warm gently. Freeze the whole pie (unbaked or baked) for up to 3 months. Wrap tightly in plastic, then foil. I always bake one extra crust—it makes killer hand pies the next day. Store dough scraps in the fridge for 3 days or freeze for 3 months in a sealed bag. The filling can be prepped ahead and kept in the fridge for 24 hours before baking.
Why You'll Love This Recipe
- No-Roll-Pastry Trick: I swear by this shortcut—just mix flour, butter, and ice water until it almost holds together. No fussing with chilled dough or rolling pins. That buttery crust? Ready in 10 minutes while you prep the filling.
- Spiced Sugar Magic: The brown sugar and cinnamon combo in the filling? It’s like Starbucks’ caramel apple dream but better. The brown sugar caramelizes into little pockets of gooey sweetness, and the cinnamon? It lingers like a warm hug.
- Weeknight Crowd-Pleaser: Between us, this is my go-to for book club nights or lazy Sundays. Slice it with vanilla ice cream, serve with coffee, or pack slices for lunch—it’s the one dessert that everyone actually finishes.
- Budget-Friendly Indulgence: Honestly, you’re spending less than $10 for a pie that tastes like a bakery’s. That butter crust alone makes it feel special, and the spices stretch your dollar without sacrificing flavor. Leftovers? Reheat slices in the oven—crispy all over again.
Step-by-step instructions for Starbucks-style apple pie
Here's how to create that signature Starbucks apple pie with a perfect lattice crust and spiced filling.
🍳 Step 1: Prepare the Apple Filling
Peel, core, and slice the 8 medium apples into ¼-inch thick pieces. Toss them in a large bowl with 2 tbsp lemon juice—this prevents browning and adds brightness. In a separate bowl, whisk together 1.5 cups granulated sugar, 0.5 cup light brown sugar, 2 tbsp ground cinnamon, 0.5 tsp ground nutmeg, 2 tbsp cornstarch, and 1 tsp salt. Pour this dry mixture over the apples and gently toss until evenly coated.
Here's the thing—don't skip the cornstarch. It thickens the juices and keeps the filling from turning into soup. Spread the apple mixture in a single layer on a baking sheet and let it sit for 15 minutes at room temperature. This helps the flavors meld and prevents a soggy crust later.
👨🍳 Step 2: Make the Crust and Lattice Topping
Cut the 1 cup unsalted butter into ½-inch cubes and place in the freezer for 10 minutes to keep it cold. In a large bowl, whisk together 4 cups all-purpose flour and 1 tsp salt. Add the cold butter cubes and use a pastry cutter or your fingers to work the butter into the flour until the mixture resembles coarse crumbs with some pea-sized pieces remaining.
Split the dough into two equal portions. For the lattice topping, take one portion and roll it out on a floured surface into a 12x15-inch rectangle. Cut this rectangle into 1-inch wide strips using a sharp knife or pizza cutter. For the bottom crust, roll out the other portion into a 12-inch circle and transfer it to a 9-inch pie dish. Press the edges gently to form a rim.
🥘 Step 3: Assemble and Fill the Pie
Spread the prepared apple filling evenly into the bottom crust, mounding it slightly in the center. Arrange 6 of the 1-inch strips horizontally across the top, spaced about ½ inch apart. Fold back every other strip, then place 6 vertical strips perpendicular to the horizontal ones, alternating the fold direction. This creates that classic lattice pattern.
Press the edges of the lattice strips gently to seal them to the bottom crust. Whisk together 1 whole large egg and 0.25 cup heavy cream in a small bowl, then brush this mixture over the lattice strips. This egg wash gives the crust that golden sheen. Chill the assembled pie in the refrigerator for 30 minutes while you preheat the oven.
🔥 Step 4: Bake to Golden Perfection
Preheat your oven to 375°F. Place a baking sheet on the lower rack to catch any drips. Bake the pie for 50-60 minutes until the crust is deep golden brown and the filling is bubbling. If the lattice starts to brown too quickly, tent it loosely with aluminum foil.
Here's where it gets fun—when the pie is nearly done, the filling should be thick and the apples tender but not mushy. If the edges of the crust are browning too fast, cover them with foil. The pie is done when the internal temperature reaches 195°F and the filling is set but still slightly jiggly in the center.
⏰ Step 5: Cool and Serve
Remove the pie from the oven and let it cool on a wire rack for 2 hours before slicing. This resting time is crucial—it allows the filling to set properly and prevents a runny pie. Serve warm with a scoop of vanilla ice cream or a dollop of whipped cream for that classic Starbucks experience.
Real talk: the first slice is always the best. The crust should be crisp but not brittle, and the filling should be perfectly spiced with juicy apple pieces in every bite. If you made it through all these steps, you've just recreated that iconic Starbucks apple pie at home!
Pro Tips For Making Starbucks Apple Pie
- CHILL THE BUTTER FIRST: Starbucks’ crust uses cold butter cut into pea-sized pieces—don’t skip this. I learned the hard way that warm butter melts too fast, turning the crust greasy instead of flaky. Pull it straight from the fridge, or even better, freeze it for 10 minutes before cutting.
- WEIGHT THE APPLES: This isn’t just about pretty slices—it’s about texture. Starbucks’ recipe relies on firm apples (like Honeycrisp or Granny Smith) that hold their shape but still soften. Toss them in lemon juice before baking to prevent browning, and pat them dry so the sugar caramelizes instead of steaming.
- VENT THE CRUST: The top crust in this pie is thick, and if you don’t cut a few slits (or use a lattice), steam builds up like a sauna. I used to skip this and ended up with soggy bottoms. Cut 4-5 one-inch slits after brushing with egg wash—it looks intentional, and the pie bakes evenly.
- SALT THE CRUST: The recipe might not mention it, but the crust needs a pinch of salt—about ½ teaspoon for the whole dough. Unsalted butter alone makes the crust taste bland, and you’ll regret it when the filling’s sweetness overpowers everything. Mix it into the flour before adding butter.
Pro cooking tips for starbucks apple pie
Crust Perfection
For a lattice crust that looks like it came from Starbucks, keep your butter cold at all times. I mean freezer-cold—pop those cubes in the fridge for 10 minutes before using, and don’t let them warm up while mixing.
Use a pastry cutter or your fingers to work the butter into the flour until you get pea-sized pieces—no smaller, or your crust will turn tough. Roll out the dough on a floured surface with a rolling pin, but don’t press too hard.
The goal is a 12-inch circle that’s about ⅛-inch thick—any thicker, and it won’t bake evenly. 🧈
Filling Secrets
The filling is where the magic happens, so don’t skip the cornstarch—it’s non-negotiable for that thick, saucy texture. Toss the sliced apples with lemon juice immediately after cutting to prevent browning, and let them sit for 15 minutes before baking.
This helps the spices meld and keeps the crust from getting soggy. For extra depth, swap 1 tbsp water in the filling for apple cider or bourbon. Trust me, it takes the flavor to the next level. 🍎
Lattice Mastery
Cutting the lattice strips is easier than it looks—just roll out the dough into a 12x15-inch rectangle and slice it into 1-inch strips with a sharp knife or pizza cutter. Arrange 6 horizontal strips first, spacing them ½ inch apart, then fold back every other strip.
Add 6 vertical strips perpendicular to the horizontal ones, alternating the fold direction. Press the edges gently to seal them to the bottom crust. This creates those signature gaps that let steam escape while keeping the filling moist. 🌟
Baking Like a Pro
Preheat your oven to 375°F and place a baking sheet on the lower rack to catch drips. Bake the pie for 50-60 minutes, but keep an eye on it—if the lattice starts browning too fast, tent it loosely with aluminum foil.
The pie is done when the internal temperature hits 195°F and the filling is set but still slightly jiggly. Let it cool for 2 hours before slicing—this resting time is everything for that perfect texture. 🔥
Egg Wash Trick
That golden sheen on the lattice? It’s all thanks to the egg wash. Whisk 1 egg + ¼ cup heavy cream in a small bowl and brush it over the lattice strips just before baking. The cream adds richness, and the egg helps create that glossy finish.
For extra shine, brush it on again after 20 minutes of baking. Pro tip: Use a pastry brush for even coverage—don’t just pour it on, or you’ll end up with a messy crust. ✨
Nutrition facts
Frequently asked questions
Can I make this pie with store-bought crust?
For a quick version, use two 9-inch pre-made pie crusts—one for the bottom and one for the lattice top. Just roll out the second crust into strips and follow the same lattice assembly method. The texture won't be as flaky as homemade, but it'll still taste delicious with that signature Starbucks spice blend.
What's the best way to store leftovers?
Wrap slices tightly in plastic wrap and store in an airtight container for 3-4 days in the fridge. For longer storage, freeze individual slices (wrapped separately) for upstrong> 3 months. Reheat at 350°F for 10-12 minutes covered with foil to maintain moisture. The crust stays crispy best when reheated gently.
Why did my lattice turn out uneven?
Uneven lattice usually happens when strips aren't cut uniformly or spaced properly. Use a sharp knife or pizza cutter for clean 1-inch strips, and space them ½ inch apart before folding. Chill the assembled pie for 30 minutes before baking—this helps the dough hold its shape better. If strips shrink during baking, cover with foil after 20 minutes to prevent over-browning.
Can I make this pie gluten-free?
Yes, but you'll need a gluten-free crust recipe (like almond flour or dedicated GF pie crust mix) and a thickener like arrowroot powder instead of cornstarch. The filling will still work, but the texture may be slightly different. Test with 1 extra tbsp thickener to compensate for the lack of gluten's binding properties. Pair with gluten-free ice cream for a complete GF dessert.
How can I make the crust extra crispy?
For maximum crispiness, bake the pie on a preheated 400°F baking sheet below the pie to reflect heat upward. Brush the lattice with 1 extra egg wash (1 egg + 2 tbsp cream) after 20 minutes of baking. Let it cool completely on a wire rack—never in the pie dish—to prevent steam from making the crust soggy. The first slice after full cooling will be perfectly crisp!